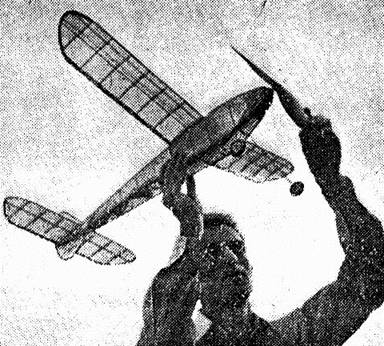
Here's Earl Stahl, designer of the "Hi-Climber," getting set to launch his craft for one of her rip-snortin', ozone chewing flights
The Plan Page
[ Home ] [ Previous Plan Pages ]
[ Special Things ] [ Earl Stahl Plans ]
gt-hunter1@home.com
Here's Earl Stahl, designer of the "Hi-Climber," getting set to launch his craft
for one of her rip-snortin', ozone chewing flights
A top-notch
Hi-Climber
Now that summer's here in full blast, we thought you potential contest winners would want a Job that'd put you in the prize-taking class at tourneys. Well, our "Hi-Climber" is just that ship, boys! Yessir, she's a push-over to build and a humdinger for turning in long endurance flights. So don't lose any time in constructing YOUR copy of this thermal-loving balsa-baby!
By Earl Stahl
HOW MANY times have you wanted to build a swell flying sport model - one that would turn in an excellent performance every flight yet isn't too hard to build? Well, here it is, boys - the FLYING ACES Hi-Climber!
Originally designed to provide good flights with a minimum of construction labor, the Hi-Climber in the past eighteen months has repeatedly demonstrated its ability to make consistently good flights. During the past summer, blue prints of the original plans were given to members of the Model Flying Club, of Johnstown, Pa., and more than a score of successful planes were constructed. In fact, quite a number of these models placed high in several contests.
Any model builder will find the performance of this contest corker interesting. When well adjusted, consistent 90 second flights can be made in most atmospheric conditions, and when the weather is ideal the length of flights is considerably longer. The longest flight to date lasted 14 min, before the Hi-Climber became invisible in the distance - it was recovered, however, and was finally wrecked by an enthusiastic retriever who fell on it.
The method of construction is quite orthodox. And since the plane is so simple, most any boy will be able to build it. Naturally, it is important to understand the general procedure before actual work is begun, so the plans should be studied carefully. Most details are shown full size, but such parts as the wing and stabilizer, because of their size, are not shown full scale. Therefore, the first job is to make the proper size plans on a large sheet of paper.
A complete list of necessary materials is provided on the opposite page, and for a few cents your neighborhood model dealer will supply everything needed to build your Hi-Climber. Note the various grades of wood indicated, and try to obtain the exact kind specified. Now, if your workbench has been cleared, and the required tools are on hand - razor blade, small pliers, and pins - you can get to work.
FUSELAGE CONSTRUCTION
BY WORKING directly over the plan, the two sides are built, one over the other (the use of pins. incidentally, will aid in keeping the longerons and uprights in their exact positions until the glue is dry). It is advisable to build the tail piece as a part of the fuselage, and then, when the unit is entirely completed it can be cut off.
The diagonal members are cemented directly to the fuselage sides as the plans show, but note that they are on the inside when the top and bottom cross-pieces are added to complete the framework. All joints should be well cemented, since the fuselage is subjected to much strain and punishment. Shaded areas in the front and back are filled with 1/16" balsa on all sides to provide a suitable place to hold the model while winding the rubber motor. Two thin metal plates should be glued to the back of the fuselage, and a hard wood dowel is fitted through to retain the rubber motor.
The frame is not complete until the landing gear is added. Bend .034 piano wire to the size indicated, bind the struts to the fuselage with strong thread, and glue the small wood gussets in piece.
WING AND TAIL
CUT SIXTEEN ribs from a sheet of 1/16" medium balsa. But be very careful and make them exactly as the plans show. The spars should be hard balsa and must fit accurately into the notches in the ribs. This multiple spar type of construction is very strong and helps to retain the airfoil's shape. The wing tip pieces are cut from 1/8" sheet balsa and are glued firmly in position. Remember that a good fit makes for neatness.
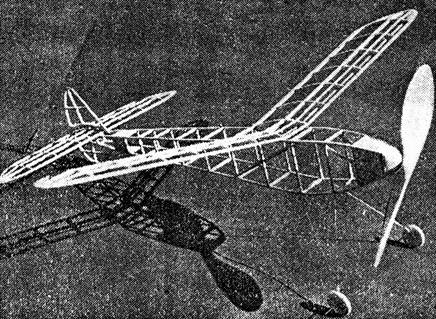
This
is not only a coring skeleton shot of our multi-spar ship, but it also shows how
easy she'll be for all you boys to build. Shux, fellows there's really nothing
to her! No bulkheads to carve, no bothersome stringers, either - just box-like
formers that'll be a pipe to form from odd pieces of balsa
The plans show the correct angle to incline the end-ribs of each wing-panel so the dihedral will be correct when assembled. When thoroughly dry, the leading and trailing edges, as well as the tips, should be cut and sanded smooth - but do not assemble the three separate pieces (outer panels and center panel) until they are covered.
Construction of the Hi-Climber's tail surfaces is so similar to the wing that details are not necessary. However, a full sized stabilizer drawing must be made. The ribs are cut from 1/16" sheet balsa, spars are hard balsa. Work directly over the plans, trim and sand the parts to their proper shapes when dry.
PROPELLER
FOR top-notch flights a good prop is a necessity; take plenty of time on the job, and make this the best airscrew you ever carved. A hard block of balsa should be blanked out as the drawings specify. First, drill a tiny hole exactly through the center for the prop shaft and then carefully carve a right hand prop.
Cut the back face of the blades first, about 3/32" of undercamber should be sanded into each one. Make the blades as thin and efficient as possible while still retaining the necessary strength. Once they are cut to a pleasing, effective shape, the blades should be sanded well and several coats of clear dope applied. Sand lightly between each coat; 3 or 4 applications of heavy dope should give a fine luster.
It is advisable to complete the prop unit now. Make a nose plug from very hard balsa. Looking from the top, the hole through the plug should be slightly to the right about 2 degrees. Washers are glued to both sides of the prop and nose plug to reduce friction and prevent wear, and an additional washer glued to the prop provides the catch for the free-wheeling device. The prop shaft is bent from .040 wire and should have a loop for winding as well as a free-wheeler which is operated by a coil spring. A notch in the nose plug provides the means of holding the unit to the fuselage by a rubber band.
COVERING AND ASSEMBLY
SINCE all the individual parts have been completed, they should be covered at this time. It is advisable to lightly but thoroughly sand the entire framework in order that any imperfections, or bits of roughness, are removed before the covering process is begun. Colored tissue is used. But select colors that are attractive yet readily seen. Orange and black, red and black, or blue and yellow are especially good combinations.
Notice the direction of the paper's grain, and cover each part with the grain running the longest way the grain will run span-wise on the wings, and from nose to tail on the fuselage. Banana oil or light dope is used to adhere the paper. Wrinkles may be eliminated if small, separate pieces of tissue are used on wing tips or other curved parts.
Tighten the tissue by a spraying lightly with water. If the surfaces are pinned to a flat board they will not warp. When completely dry, one or two coats of dope are applied - but always dope in a dry room of average temperature to avoid "blushing."
Assembly of the various parts completes the construction. The wing has three inches of dihedral, Elevate both panels the proper amount and firmly glue the center section joints. The stabilizer and rudder are glued to the tail piece the stabilizer setting directly atop it, and the rudder exactly neutral or slightly to the right.
The plans show the small, curved bamboo pieces which are glued to the top and bottom of the tail piece; rubber bands are wrapped about these and the dowel pin to hold the tail assembly in position. A single loop of 1/8" flat rubber holds the wing to the body. Any exposed wood parts such as wheels or nose plug should of course be color doped, and the construction will be finished.
Obtain fresh, brown rubber for the motor. Twelve or fourteen strands should be used, depending on the model's weight. The original ship flew well on twelve strands, but fourteen improved the climb. The prop shaft should be covered with rubber tubing to prevent cutting the rubber strands, and it should have a catch as shown to keep the wire from straightening when the motor is tightly wound. Once the motor is lubricated and placed in the fuselage the plane is ready to be flown.
FLYING THE MODEL
THE approximate wing position is indicated and if the plans were followed exactly, the wing and stabilizer angles will be correct. Glide by hand until a long flat glide is achieved. Sliding the wing fore or aft will correct any diving or stalling tendencies.
Best performance is obtained when the Hi-Climber flies and glides in right hand circles of about 70 foot diameter. Once the glide is good, correct any improper flight attitudes by off-setting the thrust line. But if a tendency to "mush" is apparent, a sliver of balsa at the top of the nose plug, causing it to pull down slightly, will probably correct it. Right or left thrust as needed will help make the plane circle exactly as desired while under power.
When the adjustments seem satisfactory, a mechanical winder should be used. And the 14 strand motor, if stretched out about two and one-half times, can be safely wound 750 turns. Don't forget to put your name and address on your Hi-Climber and if you want to photograph it, do it before you fly it - many models have been lost on their first test hope.
Once the Hi-Climber is flying well, don't be content to leave it unchanged. Instead, experiment with different adjustments, try a one blade prop, different power ratios, or your pet airfoil. This is a fine basic design, but possibly you can better it. Why not try?
|
Bill of Materials Nine strips 1/8" by 1/8" by 36" medium balsa for fuselage, wing and tail surfaces; Four strips 1/16" by 1/16" by 36" hard balsa for wing; Two strips 1/8" by 3/8" by 36" medium balsa for wing and tail surfaces; One sheet 1/16" by 2" by 36" soft balsa for ribs and fillers; One sheet 1/8" by 2" by 18" medium balsa for wing tips, etc.; One block 1" by 1-1/2" by 12" very hard balsa far propeller; Hard-wood wheels, washers, 25 feet of 1/8" flat brown rubber, 034 and .040 piano wire, glue, dope, tissue, rubber tubing, pins, and sandpaper. |
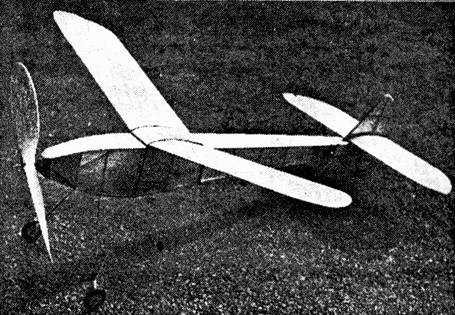
And now, our
"Hi-Climber" is all preened and ready to go on one of her zooming trips to the
troposphere. It'll be cinchy to make your model as smooth as this one, too. You
see, her flat sides not only make for ease of construction, but also ease of
covering
Scanned from August, 1939
Flying Aces
![]()
![]()
![]()
[ Home ] [ Previous Plan Pages ] [ Special
Things ] [ Earl Stahl Plans ]