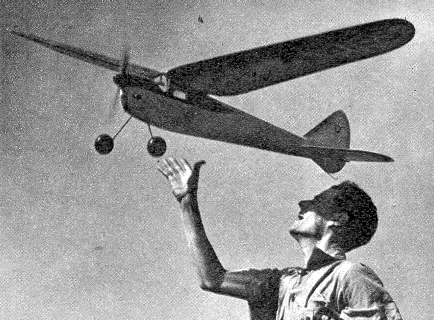
FLYAWAY THIS 6' SEMISCALE JOB SHOWS THE
WEST-COAST TREND FOR REALISM.
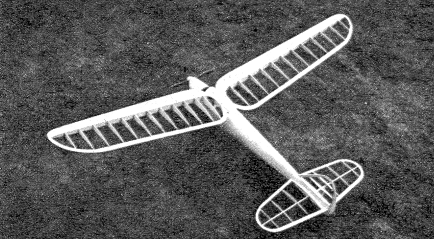
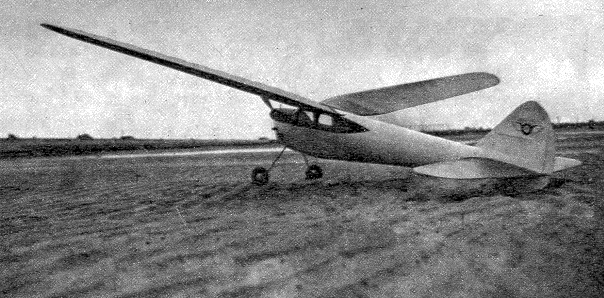
IT has long been the author's contention that contest models can be built that will actually resemble real planes, and not some spidery nightmare. To achieve this end, some six years of experience in the design and flying of contest gas models was applied, together with an even longer experience in the designing of flying scale and semiscale models. The result is a sleek-looking, semiscale type that has been carefully proportioned for the best aerodynamic efficiency. FUSELAGE: Cut all formers; then cement the lower longeron into the notch at the rear of the curved balsa keel. Next, attach formers two and four in their proper positions, and fit the wing seat in between them. Add former three, and when it has dried in place, add the side longerons. Trim them square with the bottom keel piece, and mount the fuselage upright on your work board. Add the remaining formers in their proper places. Notice that the side longerons end at former eleven, but that the tipper and lower ones continue to the rudder post, which is former twelve. Add the rudder and stabilizer spars, and last of all, the first former. When these are in place, start the covering of the fuselage with sheet balsa or bass. The rudder should be completely assembled before the rear portion of the fuselage is covered, as the wood covering fairs into the upper and lower parts of the fin for streamlining. The ribs for the rudder and stabilizer are slipped onto the spar, and then the curved balsa tips, cemented to the leading and trailing edges, are fastened in place, and the ribs brought into proper position against them. Note the fill between the number one stabilizer rib and the side of the fuselage to provide a base for application of covering material. A small block, above and below the stabilizer spar on former eleven, will add to the rigidity of the surface. The motor mounts on the original ships were bent from 1/16" Dural, 24ST, but due to the shortage of this material, an alternate plywood mount is shown. Practically any good Class C engine can be used, although the Bunch is recommended. WINGS: The wing is built in quarters, starting with the rear portion of each panel. Cut all ribs and spars and begin assembly by cementing the tip bow and center-section cutout bow to the trailing edge. After this has been clone, insert and cement rib "C" in place, adding the others after the cement has dried. After all rear rib sections are in place, add the innermost and outermost of the tip ribs, and between them cement the leading edge. When this has set, add the remaining ribs and the inner leading-edge bow. The wing is now ready for the top and bottom surfaces of the "box" spar. Leave the lower inner portion uncovered until after assembly of the two wing halves. The two wing halves are propped up to the proper dihedral angle. The main spar splice is made by the addition of two plywood strips, one on each side of the spar. A piece of 1" x 1/4" balsa makes the trailing-edge joint, and a large piece of 1/8" sheet, backed by a piece of 1" x 1/4", makes the leading-edge joint. COVERING: The original ship was covered with silk, but other material must be used at present. Do not rush things; take your time and do a good job. On the original silk covering, two coats of clear dope were applied by brush, and then two of color, also by brush. A paint spray can be used if desired. FLYING: First, check all surfaces for warps and misalignment. Balance the ship until it is level when supported at the center of the wing. This is a safe adjustment for testing, although individual ships may vary from this point. To test the adjustments, set the ship on the ground, facing the wind, and push it forward. The tail should lift, and the plane roll for twenty or thirty feet in a straight line. Try this with successively harder shoves until the wheels leave the ground. Any tendency to stall can be noticed here and corrected before damage results. A noise-heavy condition or too little incidence will keep the ship on the ground with tail high even with a hard shove. Now try a few test glides and then half-throttled power flights. Before increasing the power, make any corrections to the adjustment, that seem necessary. For maximum performance, use a low-pitch propeller, which should give the ship a steep, left-circle climb, with a flat pull-out at the switch-off. The glide should be a left circle of 100 - 200 - foot diameter. Since the glide is the most important part of the flight, the adjustments, that control it, CG, rudder and incidence, should be left alone. The climb should be controlled by power adjustments, either sidethrust or down thrust. Scanned From October 1943
|