|
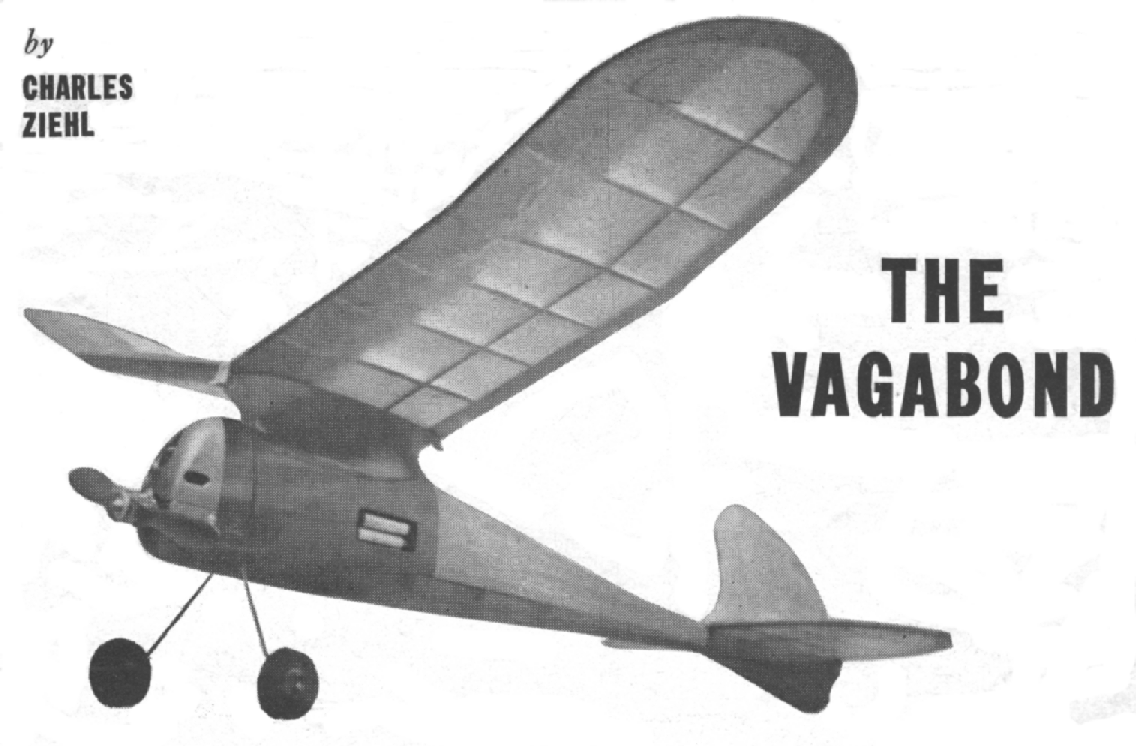
HERE at long last is a model that has been so simplified that there is no beginner who need be afraid to undertake its construction and yet every experienced modeler will find it well worth his while to build. About a year ago the author decided to design a gas model. which would come within the capacities of a new modeler. The first requisite would have to be simplicity. Taking this into consideration work began on a highly simplified plane. In so designing, all thoughts of super performance were cast aside in favor of simple, down-to-earth construction. Upon completion of this job a few test flights were required for adjustments and then the plane was given a real trial. Seeing its possibilities, it was entered in a local club contest at Creedmore, Long Island. Its potentialities were realized when it took first place in this contest. Thinking that even this could be bettered the author then attempted to combine the same construction with a better performance. Drag was considerably lowered by streamlining and a new airfoil was used in the wing. This proved to be better than expectations. At Creedmore the following month, after an hour of adjustments and low-powered flights, she was opened up wide. On a 20-second motor run the plane vanished after 4:09, but luckily was later returned. Now, after almost a year of constant designing, building, testing and re-designing this is the final product and by all means it not only combines simplicity of design and top-notch performance, but also that all important "eye-appeal." But, far from being just a contest model, this rugged little ship often provided a day of sport for the mere price of a pair of pen cells by combining a short motor run and a folding prop. Knowing the model builders' "love" for enlarging plans this has been eliminated as much as possible. The only odd shaped unit is the rudder and follows it's given full size in the diagrams, so why worry? Arm yourself with a few sheets of paper, a pencil, a compass, ruler and the required building materials, hibernate to a secluded spot and in a few short days you can blossom forth with a model which will guarantee you success. FUSELAGE: Construction begins with the fuselage which has been simplified to the nth degree. The only plan required for its construction is the plan of the crutch. This can easily be made by following the dimensions given on the top view in the construction plan of plate one. The 3/16" by 1/2" pine crutch is constructed directly on this plan. While the crutch is drying the formers, which are given full size on Plate 2, may be traced and cut out. Note that formers 2 and 3 are 1/8" sheet while 4 to 7 are 1/16" sheet. Former 1 is of plywood and is the only former glued in front of the cross brace of the crutch. When the glue is thoroughly dry on the crutch remove it from the plan and put the formers in place. After all the formers have been glued in position on the crutch the square top and bottom longerons are secured in their respective notches. When this operation is completed the landing gear and battery box are built into position. The landing gear is bent of 1/16" diameter spring steel according to the plan. Small holes are drilled in the firewall equi distant apart in alternating order on opposite sides of the position of the landing gear. The landing gear is put in place and "sewed" in a criss-cross fashion with ordinary strong black cotton thread. Several coats of glue on the thead tend to strengthen the mooring of the gear and complete its installation. The battery box is constructed of 1/8" pine. A thin brass plate is glued across the back end and two small round head machine screws are inserted in the opposite end of the box, heads inwards to act as contacts. The box is glued in position against former F3 and the crutch according to the plan. The 1/8" square stringers are now glued into the notches of F2 and F3 and against the sides of the remaining formers. Care should be taken to glue these stringers alternately on both sides of the fuselage to prevent distortion due to twisting. The pylon which is given full size on Plate 4 is of 3/16" sheet balsa and is inserted into the slot in F2 and glued to the top longeron. The 3/16" sheet wing mount is glued to the top of the pylon and F2. Small 1/8" sheet braces are cut and glued in position to reinforce the wing mount. (See sketch on Plate 1.) You will notice that the ignition, with the exception of the battery box, is completely enclosed in the fuselage and cannot be tampered with without cutting away some of the balsa covering. This means a perfect ignition must be installed. The coil, on a balsa mount, is glued against the front of F2 for proper balance. All connections should be soldered and made with a good grade of stranded wire. Cover the fuselage with 1/32" sheet to the rear of F3, covering over the battery box. Cut out the opening later. Glue the lower nose block in place and hollow out to permit the motor to swivel. Shape the outside of the block. At this point glue the 1/4" sheet sub-rudder and wire wing hooks in place. Sand the entire fuselage. The pylon is covered with wet silkspan or silk. The rest of the fuselage is covered with wet silkspan. The author found red to be the, choice color, since it can readily be seen against both sky and ground. However, since only white silkspan was obtainable the author dyed this with red curtain dye. Try it, its swell! WING: First draw wing plan to full size. Note that the wing has no taper and the tips are perfect half circles that may be drawn with a 4" compass radius. The ribs are spaced 3" apart. Cut out 13 ribs to the size given in the plan. Since the ribs are identical, place them in a vise and sand as a unit. Do this before cutting out the notches. Next cut the wing tips out of 3/16" sheet. The tips are then glued to the 3/16" by 3/4" notched trailing edge. Allow to dry. Place this on plan and pin down trailing edge only. Put ribs into position. Elevate the 1/4" square pine leading edge 3/16" off the plan and glue to ribs. Now raise the front of the wing tip to meet the leading edge and glue in place. Whey dry remove from plan and crack joints for polyhedral. Then put in 3 spars and brace the center spar with 1/8" plywood gussets at the joints. Cover the leading edge of the wing up to the top spar with 1/32" sheet balsa. 1/32" by 1/4" capstrips are added on the top and bottom of all ribs. Note that the capstrips terminate at the trailing edge. A small piece of pine fitted into the center of the trailing edge acts as a reinforcement against chafing by the rubber wing tie. Thoroughly sand all parts of the wing and cover with double tissue or silkspan. However, if double tissue is used be sure to cross the grain of the layers. . STABILIZER: Here again simplicity was maintained to the greatest extent. Since the elevator is a perfect ellipse with its major axis on the spar it will not be necessary to make a squared-off diagram of it. If the builder doesn't prefer the following method he may proceed to draw the elevator from the plan by enlarging it 4 times. However, the following is advisable: Draw a straight line. Mark off the span of the elevator. Construct the perpendicular bisector of this distance. From the intersection of these two axis swing a semi-circle above the major axis with a radius of 2-3/4". From the same point swing another semi-circle below the major axis with a radius of 4-1/4". Divide radius into any number of parts and semi-span into a corresponding number of parts. With dividers take distance "AB" and lay off on elevator plan as labeled. Mark off the points as shown. Complete with a french curve for the tips and a slightly bent strip for the rest. Note that the elevator has a lifting section. tion. The airfoil in this section, is not critical and is constructed very simply. The main spar is 3/16" by 1/8" and tapers to the tip as shown on the plan at which point it is 3/16" square. The taper is from the top, the: bottom of the spar remaining flat. The outline is of 3/16" sheet, and all the ribs are 1/16" sheet. The leading edge is hard 1/4" square. After the main spar is shaped, pin it to the plan. Cut the tip and trailing edge outline to shape and pin to the plan. Add the leading edge a cement all joints. Ribs vary in camber according to the taper of the spar. These ribs are only as high as the spar and are cut in two pieces, one extending from the leading edge to the spar, the other from the spar to the trailing edge. Do not form them until they have been cemented in place and the cement has thoroughly dried. After it has dried take a sanding block and a little elbow grease and sand the ribs to shape. Note that the finished product is a slightly lifting airfoil. RUDDER: The rudder is conventional. The outline it 3/16" sheet and the spars are 3/16" square. When the assembly is dry sand the leading and trailing edges to a streamlined section. Cement to the elevator after both units have been covered SWIVEL MOUNTS: Motor mounts are made of hardwood and are bolted to the pine crutch with a single bolt to permit the motor to swivel in the case of a hard landing. There is no necessity for a peg in the rear of the mount if the bolt is properly tightened. This will usually save the prop in the case of a rough landing. COWLING: The cowling is drawn to scale making it necessary to enlarge the drawing. (Note) The cowling shown in the drawings is for a Bantam engine. Slight alterations may he necessary if another engine is used. The cowl is best carved from a single block. After squaring two edges, lightly glue the block against the fire wall and the motor bearers and shape the outside. Remove and hollow to a wall-thickness of 1/4" all around. A layer of tissue and several coats of colored dope finish the job. FINISHING: Be sure to sand all exposed wood surfaces thoroughly before doping. The wing and tail require three coats of dope and the fuselage about five coats of dope. Colored dope is used on the nose block and silk pylon to insure oil-proofing. FLYING: Glide the model several times, adjusting the rudder until a slight right turn is obtained. For the first power flight set the timer for ten seconds and use very low power. Under power the. model should climb to the left and circle to the right. The only adjustment necessary may be a slight amount of down thrust which can easily be taken care of by loosening the two motor mount swivel bolts, tilting the engine and re-tightening the bolts. If you have followed the instructions and made your adjustments carefully you now have a model that will afford you hours of enjoyment and an excellent chance in any contest. Scanned From November, 1943
|