|
CLOUD COASTER How to build and fly a reliable contest winning sailplane -- no motor trouble and no rubber or propeller to break by JIM RYAN
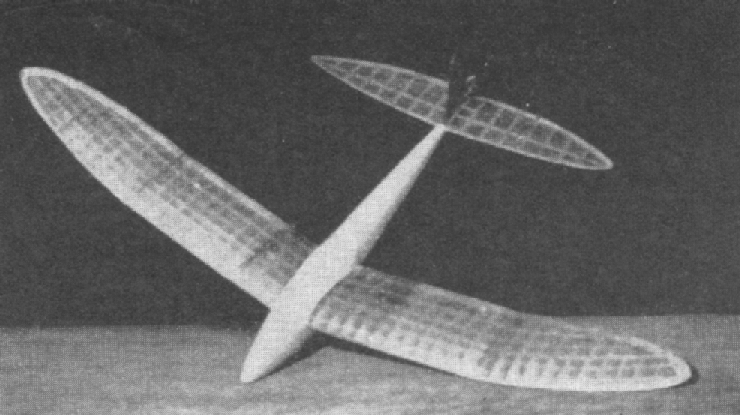
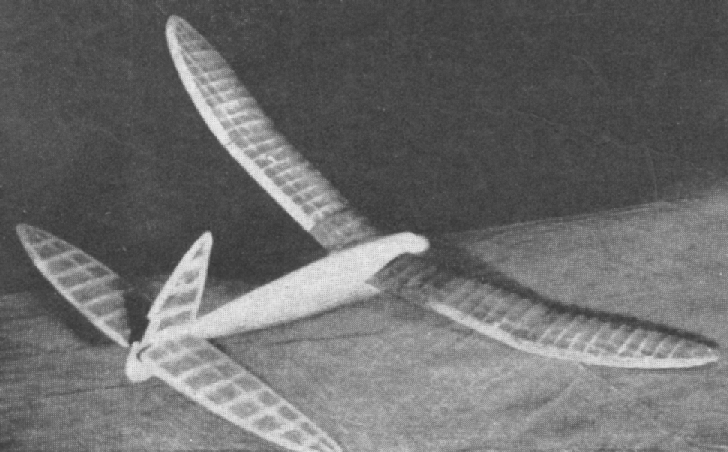
TOWLINE glider flying is at last gaining the interest of model builders throughout the country; many cities now featuring glider contests as part of their regular model program. The towline glider gets its name from the method used in launching. The ship is towed into the air by a string or towline much the same as a kite. When it is nearly overhead the line is released and the ship sails free. The average towline glider flown in contests today is either a copy of a man-carrying sailplane, with long efficient wings, or else it is assembled from the better parts of deceased fuselage and stick models. The model described here was designed for contest flying. Every part of the ship has been developed to give maximum performance as a model sailplane. The model has won many places in contests including 2nd at the Scripps-Howard Nationals. Here it averaged over a minute, despite the fact that two official flights were made in rain. Since then it has been lost on thermals twice. When properly adjusted the ship can average almost a minute, on a 100 ft. towline, without the aid of thermals or ground currents. This model is equipped with a rudder tab which is connected to the towing hook. This device makes it possible to tow the glider in a straight line, yet when the towline is released the tab will turn to give the model the proper amount of circle in the glide. This, combined with a very high lift airfoil and streamlined fuselage, makes this an ideal model for contest flying. FUSELAGE: In most cases, during the construction of this model, the grade of wood to be used for each part is labeled (hard, medium, or soft). It is as important to use wood of proper strength as it is to use wood of proper size. Fuselage is built up of formers and planked with balsa strips. Bulkheads are shown full- size on plate No. 2. As only one-half of each is shown the following procedure is recommended: First trace half the bulkhead on paper, then fold along the centerline and cut out. This will give you a pattern of the complete former which is perfectly symmetrical. Bulkheads are cut from 3/32" sheet balsa. Be sure the slot for the keel strip is in the exact position shown on the drawing. Before formers are cemented in place, check their alignment with a strip of balsa; it may be necessary to slide one or two of them slightly to the front or rear to secure an even contour. Fuselage is planked with soft 1/8" balsa. However, for protection when landing on hard ground, the several planks on the bottom of the body should be of harder wood. The planking material is cut into strips about 1/4" to 1/2" wide; these are tapered and sanded before cemented in place. The planks should be placed alternately on one side, then the other, to prevent warping. (If the rudder control is to be used, it should be installed while the fuselage is only partly planked.) The seat for the wing is not cut to shape until both wing and fuselage are completed. The hard balsa nose block is glued to the front and cut to shape. The fuselage is now sanded and given coats of wood filler or clear dope until a smooth, hard surface is obtained. It can now be painted and waxed to a high gloss finish. The wing cover is made from any good grade of drawing paper. It should be given several coats of clear dope and colored the same as the fuselage. It is held in place with Scotch cellulose tape. TAIL: A full size plan of the tail assembly should be drawn first. The stabilizer trailing edge is cut from 1/8" flat hard balsa and the leading edge from 3/16". The stabilizer is assembled as follows : First, with the leading and trailing edges pinned to a board, the lower part of each rib is cemented in place; then the spar is added, and finally the top part of each rib is cemented in place. The entire rudder is cut from hard 1/8" sheet balsa. The tab should be cut at the same time as the rest of the rudder to insure a good fit. The rudder is assembled on a flat surface. Both stabilizer and rudder are sanded and covered before they are attached to the fuselage. WING: The wing is the most important part of a glider and every care should be taken to produce a smooth airfoil, free from warps. The wing ribs are all cut from 1/16" sheet balsa. Only the main rib is shown; this is because each wing tip rib must be fitted individually to each wing panel. The procedure for cutting these ribs is as follows: First, a flat sheet is cut to fit between the leading and trailing edges. Then, using the main rib as a template, cut the lower curve of the rib. Mark up 1/8" from the bottom at the rear of the rib and cut the upper camber to shape, any excess length being taken from the rear. The last two or three ribs are square slabs of balsa glued in place and then sanded to shape. Be sure slots for the spars are cut to the exact size, in order to prevent any tendency to warp when they are glued in place. The trailing edge must be notched so that it will always remain at the same angle with the ribs and keep the exact airfoil shape. In assembling the wing the trailing edge must be raised about 3/16". Ribs are cemented in place between the leading and trailing edges, the spars added later. Spars are reinforced with 1/16" sheet balsa at each dihedral break. The center section is filled in between the ribs with 1/16" sheet balsa. The wing edges are tapered and sanded smooth. The wing is covered with "rubber model" paper and doped to a high gloss finish. RUDDER CONTROL: The towing control described here is essential to obtain the highest performance from your glider. Its operation is as follows: When the towline is pulled the tow hook moves forward slightly; this acts upon the control rod and the rudder tab, turning the tab to the straight flight position. When the towline is released the spring will return the hook, rod and tab to their original spiral flight position. Thus the ship can be set for a straight flight while being towed and yet have the much desired spiral in the glide. The hook is cut from 0.63 brass and filed round on the edges. The frame can be cut from the same material or from slightly thinner brass. The shaft is .063 and the control rod .037 music wire. The stops, which control the extent of tab movement, are small nuts and bolts soldered between the sides of the frame. A small rubber-band may be used if a suitable spring is not available. It will be necessary to cut small holes in the bulkheads for the control rod to pass. The tab arm is of .063 M.W. and is glued to the tab after small bearings have been cemented to the stationary part of the rudder. The whole hook assembly is cemented inside the fuselage after a slot for the hook has been cut in the bottom. FLYING: The wing is held in place on the fuselage by strands of rubber under the wing cover. The model is balanced by dropping pieces of lead through the opening for the wing into the space between the 1st and 2nd bulkheads. For final adjustments use B.B. shot. Don't be afraid to use plenty of lead; the model has almost 300 sq. in. of wing area and must weigh almost 9 oz. Once the ship is balanced there should not be any reason to add or remove weight. A little cement poured into the weight compartment will hold the weights in place. Further adjustments can be made by bending the stabilizer trailing edge up or down. But remember, a streamlined model is very sensitive to any adjustments made on the tail. A.M.A. rules state that in towline glider contests the towline shall be no longer than 100 feet. It is advisable to use a 100 ft. line whether you intend to enter contests or not. Any strong string will do for a towline. However, for contest work, to get the most from your model, a good grade of light silk fishline should be used. (The thin fishline with its waxed surface will give much less resistance than a "fuzzy" string and will enable you to tow your model higher.) The line may be wound on a fish reel when not in use. For your first test flight use the full 100 ft. of line. Never, when flying, leave the end of the line attached to the reel; it may at some time be necessary to let go of the towline to avoid damaging the model. Your assistant should hold the model with the towline on the hook and with the nose of the model pointing slightly upward. Have a prearranged signal with him so that, when you start to run, he will also run a few steps until the model rises out of his hand. If there is little or no wind it may be necessary to run fast at first. However, as soon as the model pulls strongly on the towline slow up. The ship climbs at almost right angles to the towline, like a kite, and the harder you pull the more you will strain the wing. Just keep enough tension on the line to keep the model climbing steadily. When it is almost overhead the line should be slackened so that the model will start to turn. A strong even pull in the direction in which the model is flying will send it around in a tight spiral upward, and the towline will drop off the hook. Do not jerk; if the line does not come off the hook when you want it to, let go of your end. Practice your launching technique to get the greatest possible altitude. Remember, you won't break any propellers, wear out any batteries, or break any rubber motors when you're flying a towline glider. VICTORY Scanned From August, 1943
|