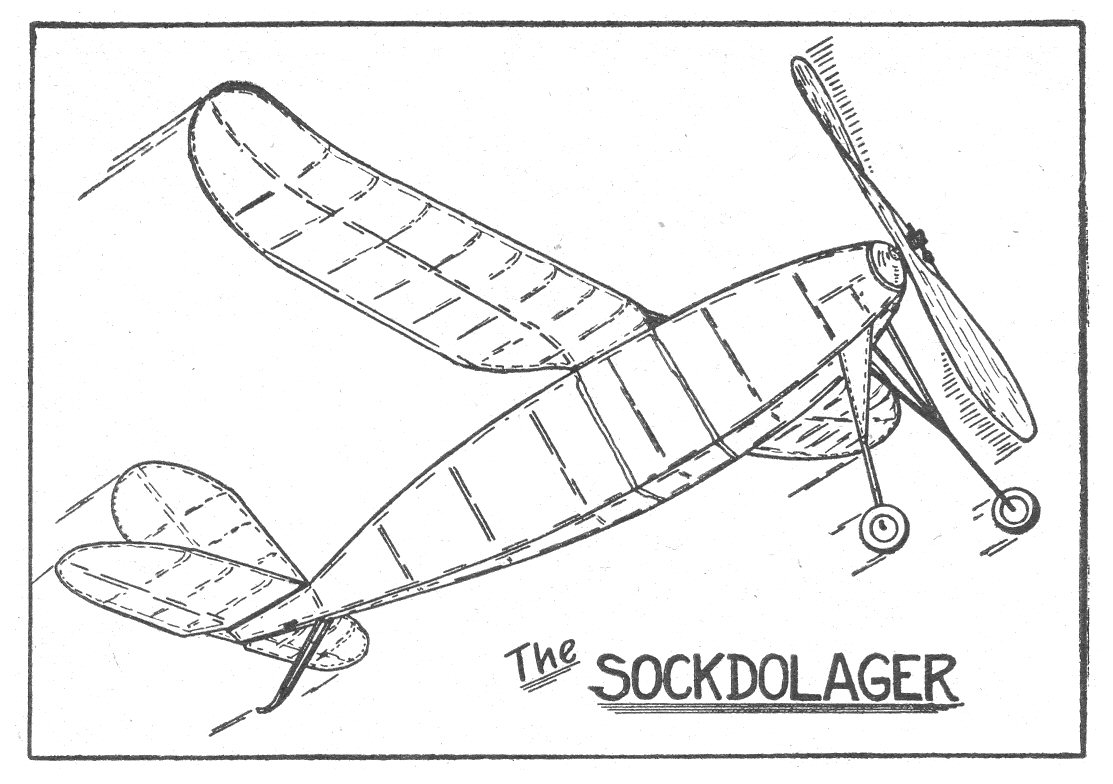
INTEREST in model airplanes is like water in a tea-kettle -- it will boil over if you're not careful. While I am always enthusiastic about model building - even when my latest hopeful cannot be persuaded to leave the ground! - I find myself literally "bubbling over" right now. Good flying weather always peps up my model interest, and these autumn days are splendid for that purpose. I can think of no more pleasant pastime than flying models on a clear fall evening. The creak of the winder - the swish of a model overhead - the red sun low in the sky, contribute to a situation that cannot be equaled. Why not take advantage of it? No doubt you have a winder - and it's sure to be creaky since all modelers neglect to oil them. The sun and sky will do their part. As for the model flying overhead - that's where Bill Barnes magazine plays the hero's role by supplying plans for the "Sockdolager" - a model which fits into fall-weather flying as neatly as a propeller shaft slips through a thrust bearing. The Sockdolager is a powered soarer, and given a little altitude it will go places. The big gull-shaped wing makes such an efficient glider that its glide often exceeds the motor duration. The average flight is about two minutes and ten seconds. However, my Sockdolager has turned in many flights longer than that. Its big moment was when it flew fifty one minutes and forty two seconds. Unfortunately this flight was unofficial, but that didn't detract from the thrill of our seven mile cross-country drive after the roaming model. This long flight was in late September and the rising currents were just strong enough to keep the model about five hundred feet above the ground. It didn't gain or lose much altitude during the flight. Finally, however, it spiraled down to earth for an easy landing in an alfalfa field. Long flights are thrilling to watch, so I hope you'll be able to "hook" a rising current. The Sockdolager is easy to build and easier to fly and is just the ship to build in your spare time before and after school. FUSELAGE
The fuselage has been shortened to 19 inches and the maximum cross-section area has been pared down to 4-1/2 square inches. The small 1" nosing at the front of the fuselage might seem too small for inserting a motor stick. It is a snug fit, but there will be space to spare after you've practiced a few times. Drawing # 1 and #2 give you the full-size top and side views of the fuselage. Join the edges of these two drawings to form a complete fuselage outline. Cover the drawing with a sheet of wax paper and pin 3/32 x 3/32" longerons to the side view of the fuselage. Make two side panels at the same time, pinning the longerons on top of each other. Cut the strut braces from 3/32 x 3/32" balsa and cement in place. Lift the two halves off the board and join them by pinning the cross struts in position while the cement dries. The fuselage is built entirely of balsa except the 1" circle of bamboo cemented to the front. The bamboo can be bent around the heated flange of an old chisel. Notice carefully the construction at the front of the fuselage. Two short pieces of 3/32 x 3/32" balsa are cemented to the fuselage front to round out the circular shape of the nosing. LANDING GEAR
Since the total weight of the finished model is about 2 ounces, the landing gear should be lightweight, strong, and flexible. The position of the landing gear is shown in drawing #1. Each half of the landing gear consists of a 7" single strut which is braced at the center by two 4-1/2" bamboo braces. A pair of 1-1/2" pant wheels are attached to the ends, of the 7" struts by #14 wire axles. A pant wheel is a wheel cut to a streamline shape. A piece of metal weighing 1/10 ounces is cemented to the wheel so it will always stop revolving when it is in a streamline position. The tread of the landing gear - the distance from wheel to wheel - should be 6" The landing gear should be high enough to provide an inch of clearance for the 16" propeller. Attach a 2" bamboo tail skid to the rear of the fuselage. MOTOR STICK
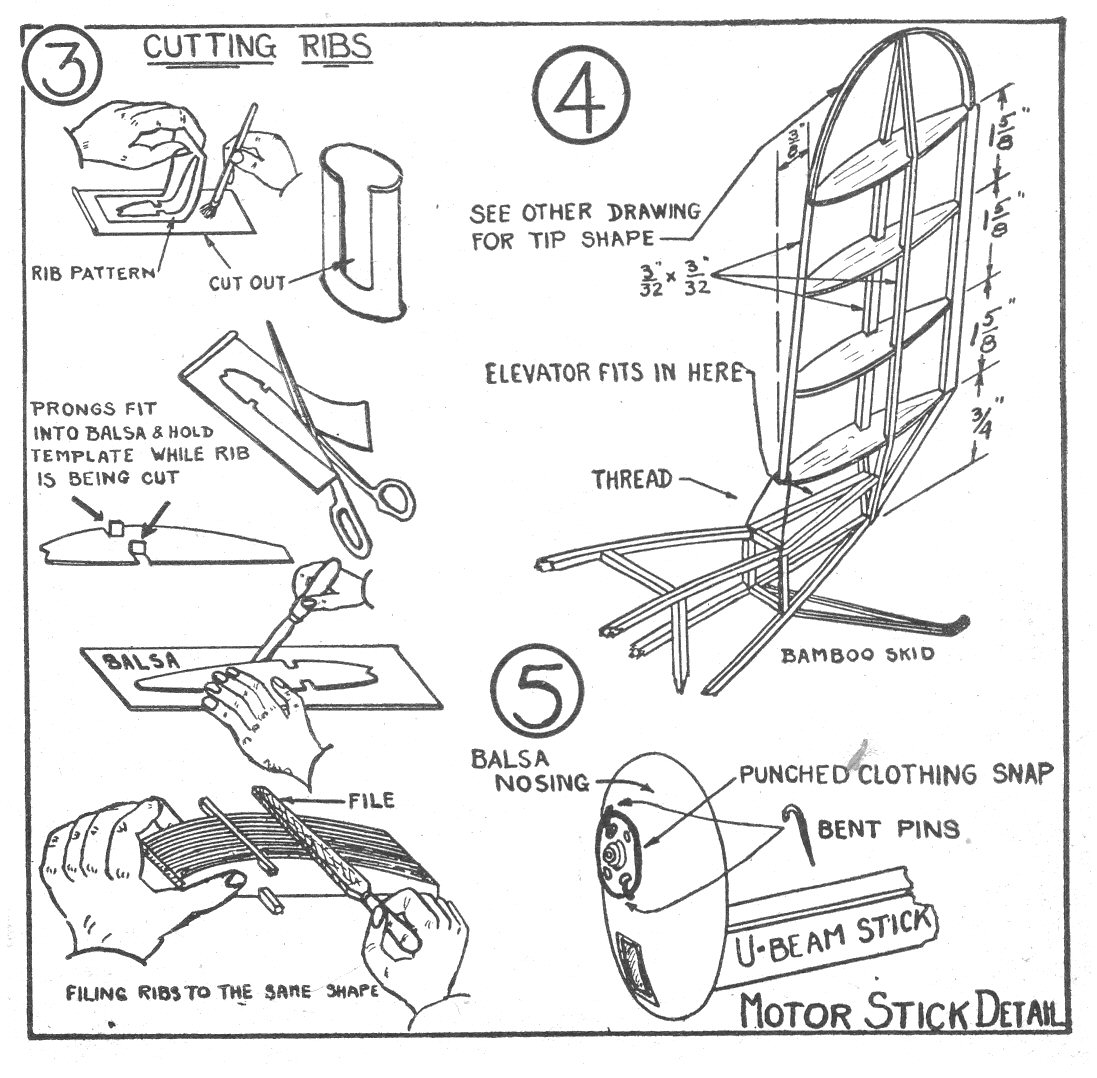
A solid or a hollow motor stick can be used on this ship. A hollow stick is more desirable since it is stronger than a solid stick of the same weight. But building up a stick out of four pieces of sheet balsa is a tough job. So unless you can get a balsa U-beam, substitute a solid motor stick of slightly heavier dimensions. If U-beams are available, get a 5/16 x 5/16" size - outside dimensions - and cement a 1/16" strip to the top of the beam. When attaching this major part of the built-up stick's strength, hold the top strip in place with loops of rubber while the cement dries. Drawings #1 and #2 indicate the shape and location of the two wire clips which hold the motor stick in the fuselage. A wire spur cemented to the bottom of the stick fits underneath the rear clip. It's a big help in keeping the motor stick in place. Cut a balsa nosing to fit the bamboo ring at the front of the fuselage. Unless this nosing fits the fuselage snugly and is the same shape, the model will look a trifle sloppy. Check this carefully. The balsa nosing is cemented to the front of the motor stick. Don't butt-joint it, but cut a notch in the nosing large enough to accommodate the stick. Insert the stick into the clips and then carefully lineup the nosing with the front of the fuselage. Coat with cement and permit it to dry before disturbing. If you've lined up the nosing properly it will always fit the fuselage regardless of how often the stick is removed for winding. Be sure the joint between the nosing and the motor stick is solid. The nosing serves as a propeller bearing and must stand the strain of a tightly wound 10-strand motor. Making a strong joint is not a hair-graying task since an ordinary cement joint between the nosing and the motor stick has carried as many as 24 strands of rubber without any sign of weakening. NEGATIVE THRUST Punched clothing snaps are cemented to both sides of the nosing. The outside clothing snap is cemented 1/4" above the stick. The inside one is cemented 5/16" above the top of the stick. Raising the inside clothing snap gives the propeller negative thrust. That is, the propeller pulls downward at a slight angle instead of pulling straight forward. Negative thrust prevents stalling and improves the glide at the end of the flight. PROPELLER
Any size propeller from 14 to 18 inches will fly this ship. Propeller efficiency and duration increase with the diameter of the propeller, so the larger the better. An 18" propeller is a trifle large to tackle unless you have had experience in carving large ones. However, you will be able to carve a 16-inch propeller if you work slowly and carefully, keeping the drawing in front of you as a guide. Cut the blades of the propeller down to 1/16" at the tips tapering to 3/16" at the hub. Reinforce the hole at the center with metal washers. Free-wheeling propeller is necessary in a long, soaring flight. There are as many types of free wheeling as there are models. Every builder seems to have his favorite method. This month we have a method new to Bill Barnes readers but an old friend among contest fliers. Drawing #7 shows how it works. WING
The gull wing is efficient for soaring. The tapering tips and cut-away center portion reduce drag. Those of you who have seen the sea gull's graceful flight realize a gull wing has a distinct advantage over the uniform chord wing. The drawback in a cantilever gull wing is the difficulty in getting sufficient strength in the center. The thinness of the center section doesn't permit the use of a thick spar. However, two auxiliary bamboo spars will supply needed strength and flexibility. The wing is drawn in reduced scale in drawing #6. The various ribs are labeled with letters and the exact rib shape can be found in drawing #7. The wing section used is the Clark-Y which is excellent for both flying and gliding. 14 ribs of 5" length and 4 ribs of varying lengths are required. A metal template is necessary for cutting out the 5" ribs. See drawing #3 for procedure. Cut out the rib pattern from the page of Bill Barnes - or trace the shape onto another sheet of paper if you don't want to cut your magazine - and cement it to a piece of sheet metal. When cutting out the metal template he sure to cut the notches for the spars and the leading edge. Note the curve at the center of the wing, also the upturned tips. Steaming the wood over the spout of a boiling teakettle will make it pliable for bending. Bend the spars before cementing to the ribs. Make the wing in two halves and complete each half before joining. The leading and trailing edges are too difficult to bend, so force them into shape. This is done by grasping the wood firmly with the thumb and forefinger of each hand. Hold your fingers close together and gently break the wood into shape. Strengthen the break with a coat of cement. Wing tips on the original model were bent from 1/16 x 1/16" medium-hard balsa. Balsa can be bent by moistening with water and then wrapping around a heated tin can. A 3" diameter can is the correct size. I have a complete collection of tin cans ranging from 1-1/2 to 5" diameters. Start your collection to-day. Watch the grocery orders and when you see a can you want, tell mother to save it. It will be useful in building future models. Bending balsa is a delicate art and if you have too much trouble, substitute bamboo tips for the balsa It's a trifle heavier but is much easier to bend. Join the two halves of the wing before covering. Two pieces of bamboo 1/16 x 1/8 x 12" strengthen the wing at the center. Detail drawing #8 shows how to do it. Each half of the wing is given 11 degrees of dihedral angle. Putting 4" blocks under each wing tip when you join the wing halves will put the required 11 degrees into your wing. Sweepback is also built into the wing. 1-1/2 degrees of sweepback is equivalent to moving each wing tip 1/2" back of the center of the wing. ELEVATOR AND RUDDER
The 12" distance between the elevator and wing is short compared to the 42" wing span. So to maintain directional and longitudinal stability the rudder and elevator were stepped up in size to 27 and 54 square inches respectively. With this size tail the model is stable. Mine never dived or stalled but flew steadily in sweeping right circles. A lifting elevator is used. That is, the rib section used is similar in shape to that used in the wing. A lifting tail helps to carry the weight of the model in addition to maintaining stable flight. This arrangement adds seconds to your flights. Elevator and rudder construction is identical to that of the wing. The rib shapes are given in drawing #7. No dihedral is put into the elevator. However, 4 degrees sweepback is built into each half of the elevator by moving each end rib 3/8" back of the center. The rudder is cemented to the rear of the fuselage. Allow enough space between the fuselage and rudder rib to insert the elevator. Thread braces run from the front of the rudder to the fuselage at the leading edge of the elevator. The top rib of the rudder is moved 3/8" back of the bottom rib. COVERING
Use banana oil to apply the tissue. If the banana oil you have is too thin, get a thicker grade from a paint store or a model shop. Drug stores sell a thin grade of banana oil that is quite useless for applying tissue. Iron the tissue through one thickness of newspaper. Have the grain of the tissue run lengthwise along the wing and fuselage. Don't fasten the wing tissue to any but the center and end ribs. However, the fuselage tissue is fastened to every strut. The section of the fuselage above the rear motor-stick clip is covered with cellophane. This is an inspection window for making sure the motor stick is inserted in the rear clip. Spray the tissue with water. An insect spray gun will do nicely. After the tissue has dried thoroughly, brush on a coat of "dope." All model supply houses sell a prepared wing dope. Its purpose is to waterproof the tissue and lay the "fuzz," but it doesn't shrink the tissue. A good elope can be made by mixing equal parts of banana oil and acetone. Duco thinner can be used instead of acetone. FLYING Loop a 15-foot strand of 1/8 x 1/30" rubber into a 10-strand motor. If you lubricate the motor with a few drops of glycerin it will last longer. You can wind this motor about 750 turns if you use a mechanical winder and stretch the motor several times its length. To get the most out of each model you should keep a complete record of its specifications together with an account of its flights. Wing and elevator settings, location of the center of gravity, and propeller duration are a few of the important facts that should be tabulated for future reference. Here's a copy of the information I have listed in my notebook under the heading "Sockdolager Model"
SPECIFICATIONS
Weights
Remarks: Slow flier with a beautiful glide. Low-wing loading made it responsive to every favorable air current. Wing was slightly weak at the center until the addition of two bamboo spars. The .2 oz. of lead added to the wheels, coupled with 11 degrees of dihedral and 4 degrees of sweepback removed all stalls and dives, making it extremely stable. My model notebook is my best friend when I'm designing a new ship. From the description of other models I can estimate the weight and duration of the proposed model. I recently finished a 40" cabin fuselage model. Contest rules required it to weigh 4 ounces. Although I had never built a ship of this design before, a careful study of the weights of previous models enabled me to estimate within 1/10 ounce the weight of the finished ship. Fly your Sockdolager in all kinds of air currents. Try different pitch propellers, wing and elevator settings. Record your results. You'll have a lot of fun and above all you'll have some definite information about your model long after it has been consigned to the scrap pile. Before we leave you this month we want to introduce an old friend, Helpful Homer. Even though Homer knows nothing about models, he drops into the shop every now and then. And the advice he gives is unique. This month it's a construction hint about wheel pants. He insists that the easiest way to make a wheel pant is to exercise it violently. Scanned From an Old Air Trails
|