|
AN ERCOUPE FROM LILLIPUT by SYDNEY STRUHL
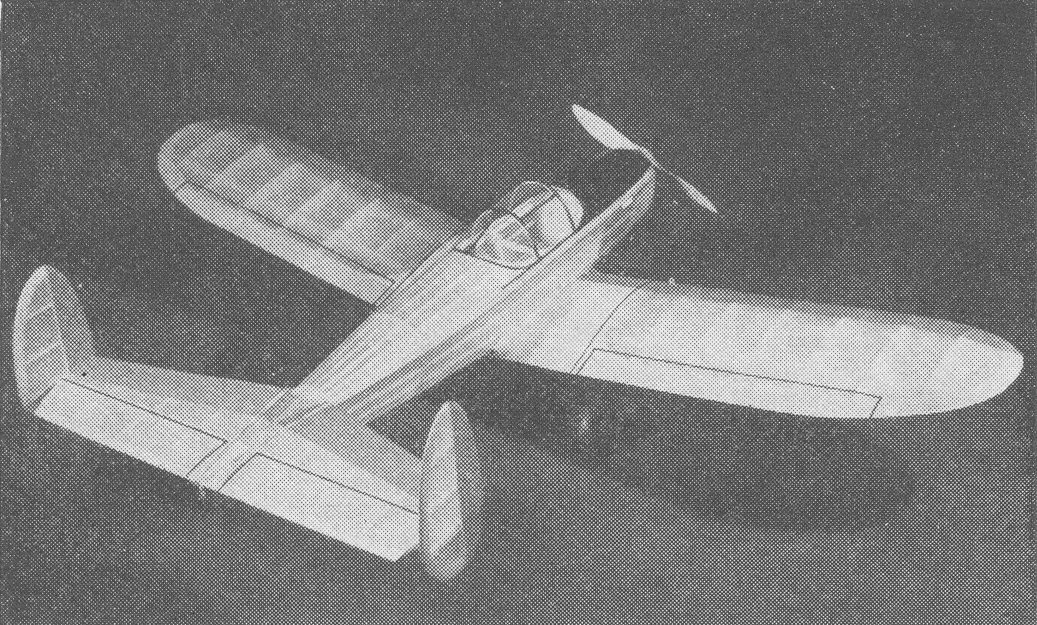
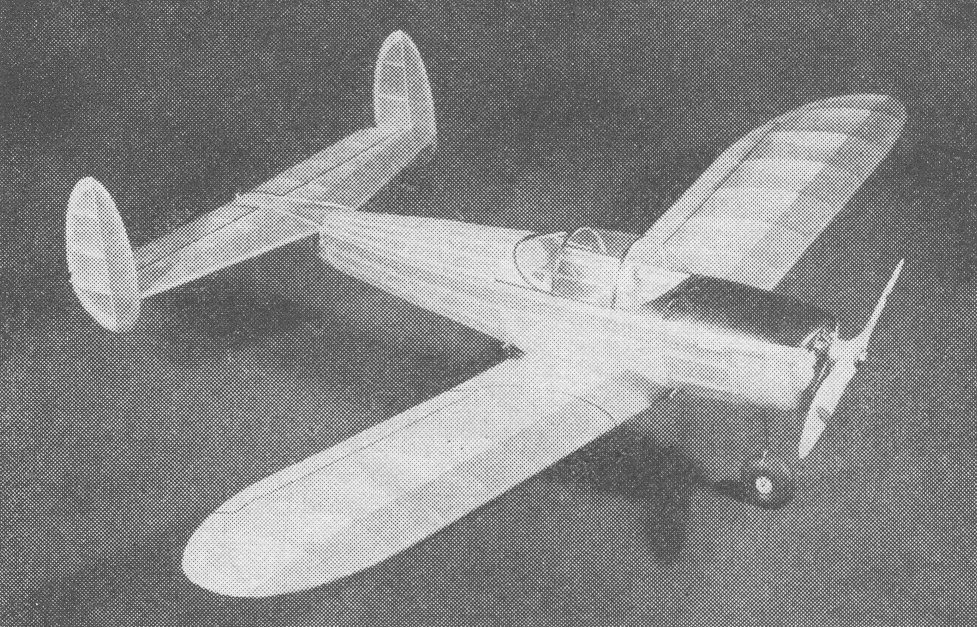
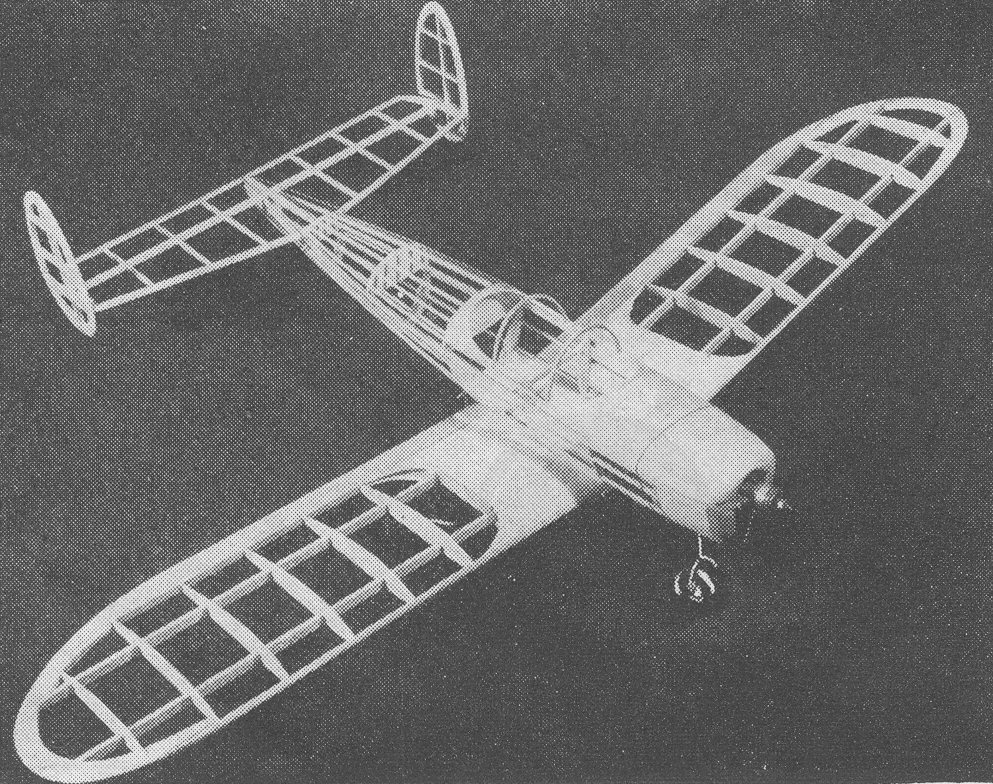
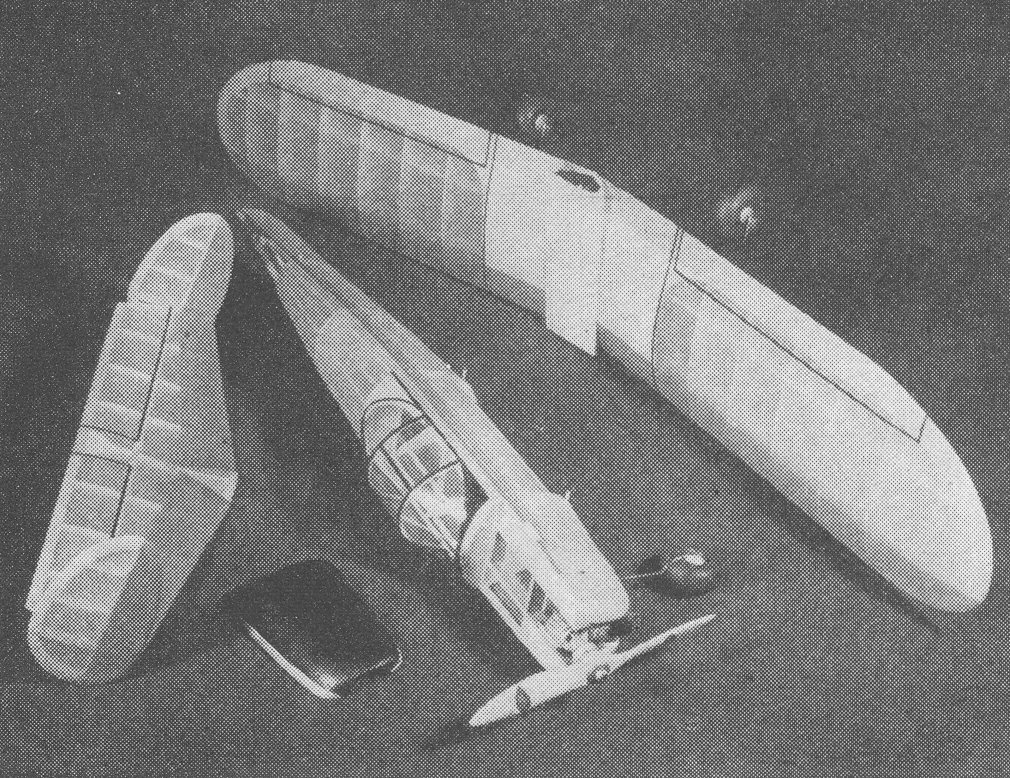
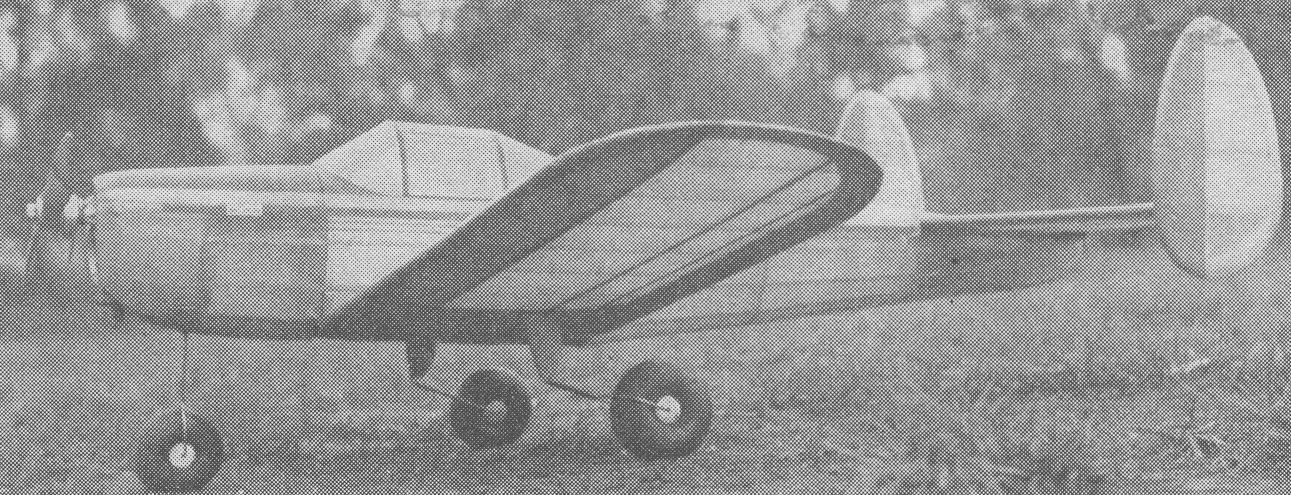
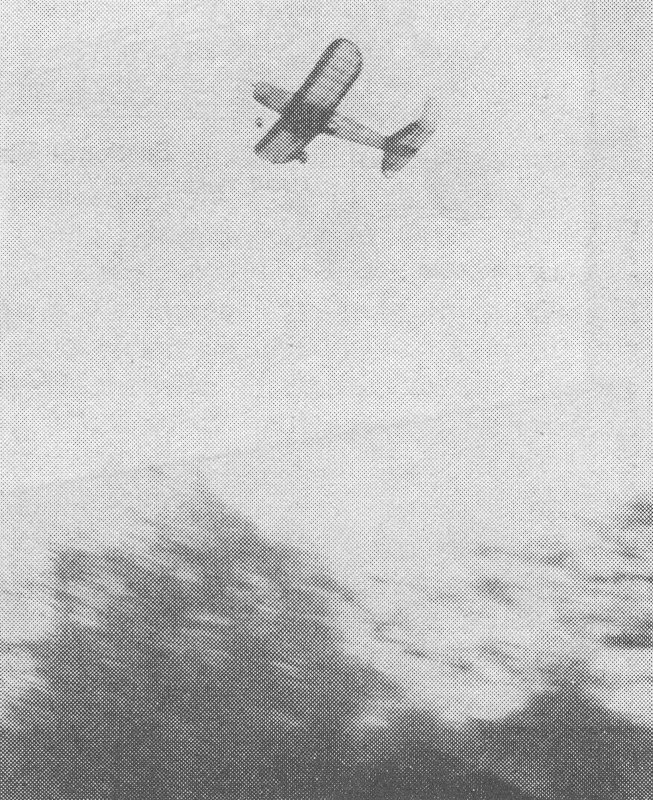
JUST prior to the United States' entry into this second World War the lightplane activities in this country was on a terrific upswing. Second-hand planes sold as cheaply as autos and plane manufacturers were offering flight instructions with every new ship purchased. Things were boomin'. Then along came the war and with it all the necessary restrictions and regulations needed for our defense. Aircraft manufacturing turned its full attention to getting the best equipment out to get this war over as soon as possible. And that is as it should be. All this adds up to the stalemating of lightplane activities for the duration, but with the promise of great advancement after the war. One of the newest and finest lightplanes to be produced is the Ercoupe. The Ercoupe is a two place airplane ideally suited for transportation or training. Of the $2,000 class, the Ercoupe looks more like a snappy military pursuit job than a sportplane. Unusual points of interest in the ship is the tricycle landing gear, twin rudders and practically all metal construction. Perhaps the most important feature of the Ercoupe is its case of handling and performing. The Ercoupe is certified by the Civil Aeronautics Authority as "characteristically incapable of spinning." And the ship does have amazing stability-it will not get out of control. Even with the wheel full back, straight flight can be maintained or turns performed at will. It is absolutely impossible to spin the ship. The quick takeoff run, fast climb and high sustained cruising speed of the Ercoupe provides point - to - point transportation which will surprise and please the private pilot. On the ground as in the air, the plane handles with great ease; no nose-ovcrs are possible even with full application of the hydraulic brakes. The Ercoupe's structure is all metal, as is the covering of all but the outer wing panels. The use of corrosion-resistant aluminum alloys in structure and covering brings to the lightplane pilot the dependability and freedom from maintenance of the large transport planes. Powered with the Continental A-65 engine, the plane has remarkable performance with surprising economy. Maximum speed is 117 mph and cruising speed is 105 mph. Cruising range is 350 miles and the landing run is only 200 feet. Fuel consumption is but 4 gal. per hour. As a scale gas model we claim that the Ercoupe performs just as well as any other model even thought it is a low-wing design. You know that a low-wing model can be designed to fly just as well as any parasol model if certain aerodynamic principles are observed; such as the proper distribution of your forces (C.G., C.L.A., C.P.) and the correct setting of attack of the plane and thrust line. Since all forces are designed into the plane you can't alter them at all, however you must be sure to keep the wing set at 0° and stabilizer set at 1-1/2 0° minus. The thrust line is kept at 0°-0°; that is, no down or side thrust. With this general setup you can make almost any low-wing model fly in a very stable manner. The construction has been kept rather simple. The use of a "crutch" in the fuselage is a great aid. All - in - all the Ercoupe is a dandy flier, a swell looking ship, easy to build – so - what do you, say if you take a crack at a low-wing scale gas model? FUSELAGE - Make a full size drawing of the fuselage crutch. No other fuselage drawing is needed. The bulkheads are given full size. Use of balsa is naturally advised but if supplies are limited, substitutions of pine or bass may be made in most cases without too great an increase in weight. Use your own judgment as to sizes of the heavier woods. Pin 1/8" x 1/4" strips in place on the drawing of the crutch and cement cross members in their proper locations. Basswood motor mounts 3/8" x 1/2" are now cemented in place. Space the motor mounts to fit your individual motor. Add the 1/4" sheet fill-in around the motor mounts and crutch with several coats of cement. Cut the bulkheads top portions from 1/8" sheet balsa and cement them in proper locations. Add necessary 1/8" square stringers to the turtle back. Cement 1/16" sheet balsa to form the cockpit shape. Build the lower portion of the fuselage by constructing the "V" shape from 1/8" x 1/4" balsa strips between bulkheads D and G. The lower portions of bulkheads D, E, F and G are now cemented against the 1/8" x 1/4" uprights. Bulkheads A, B and C are now added with H connecting A and B. The remaining fuselage stringers are now cemented in place. Cement a 1/8" sheet flooring between bulkheads B and D at the bottom of C as shown in the fuselage side view. This forms a box for the wing to slip into. Bend the front landing gear strut from 1/16" music wire with a single 2" diameter balloon wheel to the required shape. This is now secured to the plywood bulkhead A with basswood blocks, as shown, and several coats of cement. Make sure all joints are very firm. The cowling is shaped from balsa blocks cemented in place then carved and sanded to shape and hollowed to fit your motor. Motor is inverted so lower cowling is permanent while upper hatch is removable to allow engine adjustment. The tail block is carved to shape from a soft balsa block to the shape shown on plate 3. Cut two light formers to the cockpit outline from 1/16" sheet and then proceed to cover the cockpit with heavy celluloid. Cement 1/8" hardwood dowels where shown to wrap the rubber strands around that hold the wing and stabilizer in place. TAIL SURFACES - The rudders and stabilizer are very simple to make and are constructed directly over full size drawings. The stabilizer is built in one piece. Pin the 1/4" sq. leading edge and the 1/4" sq. spar on the plans along with the 3/16" x 1/2" trailing edge. Cut the ribs from 1/8" x 1/4" balsa strips and cement in place. Note the end ribs are 1/4" sq. balsa. This is to give a firm base on which to cement the rudders. Sand the ribs to a slope to flow evenly into the trailing edge, which is also tapered. Rudders are constructed in quite the same manner as the stabilizer. Full size rudder patterns are given on Plate 3; since there are two rudders, two of each pattern is needed. Cut these outlines from soft 1/4" sheet balsa and pin them in place on the plans. Insert the 1/8" x 1/4" spar and ribs and cement each joint firmly. Trim and sandpaper rudders to a streamlined crossection. Note the rudder rib that joins with the stabilizer is 1/4" square balsa. WING - The wing is constructed in one piece, built over a full size drawing. Wing construction is very simple but care must be used to avoid any warps. Cut the wing tips from 1/4" sheet balsa; full size patterns are given in Plate 3. Cut the required wing ribs. Trim the 1/4" x 1" trailing edge to shape and pin in place. Pin the two 3/16" x 1/2" wing spars in place. Now insert wing ribs in proper locations and cement firmly. The 1/4" sq. leading edge is now cemented in place. Note that the leading edge is set on edge. Trim and cement the wing tips in place. Install 3-1/2" dihedral under each wing tip; make sure the dihedral joint is strong. Use 1/8" sheet gussets on the spars and leading and trailing edges for extra strength. Bend the rear landing gear struts from 1/16" steel wire and mount as shown in the diagram. Note the ends of the landing gear struts are wrapped to the wing spars with heavy thread. It is also backed up by grooved basswood block cemented between the two spars over the wire. Use lots of cement at this point. The wheels are held in place by a drop of solder at the end of the axles. A very hard piece of balsa is used as a fairing on the upper part of the landing gear strut. Cement this to the rib too. The centersection is now covered with soft 1/16" sheet balsa to provide extra strength around the dihedral joint and landing gear stations. Trim the top and bottom of each rib 1/16" so that the wing contour is the same all along the wing. Build up a small box-like structure at the wing joint to fair into the fuselage as shown in the sketches. Use 1/8" sheet for this work. This box fairing should fit snugly into the box formed between bulkheads B and D. COVERING - It is advisable to use colored Silkspan for covering rather than color-doping the model. Of course color is optional. Use heavy clear dope as an adhesive. Sand the frameworks lightly to remove any flaws and ridges that might mar a neat covering job. If any warps have developed they should be removed before covering. Cover the fuselage first, using several pieces of Silkspan to fit the curves of the turtle-back and sides. The cowling and similar wood parts, such as the landing gear struts, are tissue covered, too. Use a separate piece of paper for top and bottom of each section of the wing and tail surfaces. Once all parts are covered lightly spray them with water to tighten the paper. Then apply two or three coats of clear dope with a brush. Cover the cabin with heavy sheet celluloid. All items such as cowling details, insignia lines or designs, control surfaces outlines, etc., are made from colored paper. Outline the windows with strips of black paper doped to the culluloid cabin. FLYING - After completion of the Ercoupe Sportplane check the model's surfaces for warps. The Ercoupe's tail and wing are constructed solidly enough to resist warping, but if warps do occur take them out. The coil and battery box is located in the fuselage where it gives the best balance for flight. Initial flights of the original Ercoupe proved its airworthiness, and by carefully making flight adjustments championship performance will result. Remember the wing must be kept at zero degrees incidence and the stabilizer is kept at 1-1/2 degrees negative incidence. Never change these settings. Shift weights to trim the ship. The thrust line has no down or side angle. Glide the ship several times, shifting weights to obtain adjustment. Remember that careful slow adjustments save much time and effort. Set the timer for 15 seconds for the first flight and use very low power. Under power the model should climb slowly in 200 foot circles to the right. When the motor cuts it should go into larger circles in a very slow glide. If the ship reacts well on the first flight, fly it again with the same power run. Then each next flight should have a wider open throttle until you are flying under full power. We have presented you with a low-wing scale gas model that we claim will fly as well as any other model on the field. If you build this model we are sure it will meet with your approval, and we know that it will bring you many hours of satisfatcory flying and enjoyment. Bill of Material
VICTORY Scanned From March 1943
|