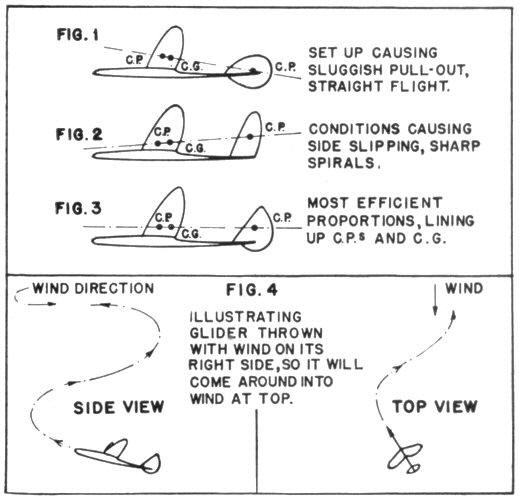
How to Improve Your Glider Flights Vital Suggestions Concerning the Technique of Glider Design and Operation That Will Enable You to Secure Better Performance By WALTER L. WEITNER GLIDER activity has been growing into a very popular branch of model airplane activity in the past few years. Practically every model builder has had experience in connection with this phase of the game and has been more or less successful in it. Many of these modelers have their own "pet" designs while many more do not know just what characteristics to employ in their gliders to make them successful, consistent fliers. To these, especially, the following information will be of the most benefit. Early type gliders employed stubby, non-sweptback, non-tapered wings. Tips of wings were rounded while the tail sections were generally of a square outline, employing no airfoil but a square section throughout. Finishes of these gliders were not considered of any importance. Therefore it was not unusual to see gliders which had not been brought into contact with sandpaper. These factors had a decided effect upon their flying ability and flights of over thirty seconds were unusual since an altitude of over forty feet was seldom attained. Builders soon found that with smoothing the surface of the wood the glide was considerably improved. Even with this improved glide, however, the boys knew that what was actually needed was to attain higher altitude on the throw. They began experimenting with sweepback, different length moment arms, fine finishes and streamlined surfaces. These in turn made the glider a sleek, polished ship capable of 100 feet or more of altitude when launched, necessitating great strength in construction. This great stress required exceptionally great strength where the wing joined the fuselage. A tough skin of cement was the answer to this problem. Thus the old box-like affairs of the first all balsa gliders were the basic designs for our modern, highly efficient ships. We are still experimenting to find the characteristics to employ in the design of the glider which will eventually lead to the nearest possible "perfect" design. In most contests of today the glider event is one of the main features and one of the more popular events. One reason for this is that the glider is simpler to build, more rugged, and its size, usually under twenty-two inches, makes it quite easily carried to contests, flying fields, etc. Lately, there have been reports of many excellent glider flights, some eclipsing the record times of many of the rubber power planes. These are due to excellent designs, fine workmanship and a lasting up-current of air. Since it has been found that sweepback adds to the altitude gained on the throw and all around stability, this characteristic of design is employed on most present day models. This brings the center of gravity of the model backwards, to present a more even distribution of fore and aft weights; thus requiring less weight for balance. In obtaining this sweepback the center section of half the glider wing is squared off. About 5/8-inch is then measured along the trailing edge toward the tip of the wing. From this point a line is drawn to the vertex of the right angle at the leading edge of the wing; and it is along this line that the cutting edge is drawn. This procedure is then repeated on the other half of the wing, completing the operation. The two halves are then cemented together to form approximately an eighteen degree sweepback angle on each side. With this arrangement, between three and four inches of dihedral, on a twenty inch wing, proves most efficient. The question of what length moment arm is to be used now arises. Both "long" and "short" have their respective advantages and disadvantages. A disturbing force will have a greater effect on a short arm than on a long one. While the long moment, being slower to react to stabilizing forces, loses its previous advantage over the short one. On the throw the short moment arm glider will recover more quickly because of its stabilizing qualities, while a longer moment ship will gain more altitude before it fully recovers to go into its straight glide. As can be seen, it is up to the designer and his experience as to what length arm is to be used on his ship. Weather conditions would have a decided effect upon this factor. In windy or breezy conditions, a shorter arm glider has proven its merit, while in calm weather a glider of greater moment length has shown itself most efficient. Before considering the moment arm, however, the tail area to be used must first be determined. On the average glider of twenty inch wing span and 42 or 45 square inches of area, a stabilizer of eight inch span, and 14 or 16 square inches in area is most efficient. This constitutes about 23% of the wing area and has been found to work better than any other set-up. With this given amount of stabilizer area a moment arm of between four and six inches has proven its efficiency. After considering the elevator area, the next step is to find how much rudder area is required. This usually is best found by taking approximately 14% of the wing area. Since a few builders have the tendency to place some of the rudder surface below the fuselage, they find some new forces acting on their ships while in flight, which they did not count on. The model does not "pull out" as it should from the throw, but instead, stalls and loses quite a bit of altitude before leveling off from the resulting dive. It also tends to head in a straight line in the direction thrown, ignoring all former adjustments made by the flier. This is a sure sign that too much of the rudder area is below the fuselage. To correct this situation all but 1 or 2 square inches should be cut away from the bottom and an addition made to the top. (Illus. Fig. 1.)
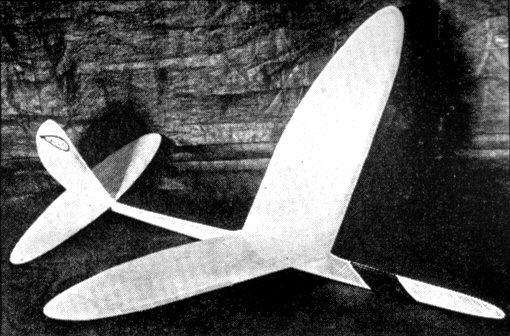
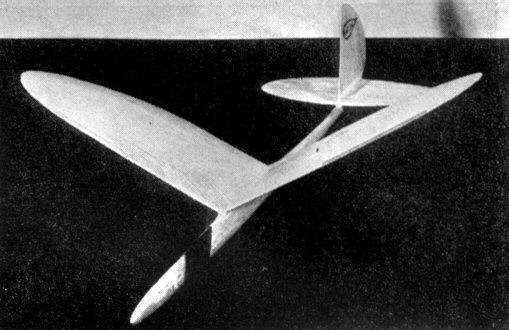
On the other hand when the rudder is extremely high, the slightest breeze or wind will cause the model to slip sidewise after it has assumed level flight, losing altitude as it does so. This, also, is a disadvantageous arrangement, since the high rudder sacrifices strength and it is quite liable to collapse from the tremendous force of the throw. (Illus. Fig. 2.) The most efficient set-up in a series of tests proved to be the rudder having one or two square inches below the fuselage, leveling off the imaginary line connecting the centers of lateral area and greatly strengthening the tail unit as a whole. (Illus. Fig. 3.) (Appreciation is extended Mr. Charles Grant for the explanation of this principle.) Lately the N.A.A. weight rule, which requires one ounce for each fifty square inches of wing area, has been applied to these motorless craft. Therefore a problem has arisen in the form of weight distribution, which must be solved. The most likely answer is that, since this added weight must be carried by the model, it might be used to some advantage in stabilizing the model instead of being a total handicap. Therefore a good part of this weight should be in the fuselage and lower parts of the glider. The weight rule forces the average glider to weigh from .6 to 1 ounce. If care is not taken in the selection of the material for the glider, the ship will probably weigh only half that when it is completed. Weight must then be added, usually making the ship completely un-airworthy. Select medium heavy wood for tail and wing and extra heavy for the fuselage, since this part must absorb most shocks. The fuselage should be of a streamline, tear-drop section while the wing is sanded to a previously determined airfoil section, to give the most lift per unit of weight. Also, the amount of dihedral used can be less than on a glider of less weight, because the fuselage acts as part of the stablizing force, and less lift is lost due to excessive dihedral. Of course, if the same amount of dihedral is used as on a lighter glider of the same type, the weight rule ship will be more stable and therefore a better flier in spite of the added weight. On a glider of this type there should be little or no angle of incidence on the wing and the, stabilizer should be set at about one degree positive incidence. This causes the radius of loop (size of verticle circle described by glider when thrown) to be enlarged. Thus the ship will attain more altitude on launching. Also, little or no balancing weight will be necessary, so these are both very decided advantages. We now come to one of the major factors facilitating fine glider flights: the art of obtaining fine, smooth, glossy finishes on all the glider surfaces. This consists of filling in the pores of the wood so that the "skin friction," caused by the airstream passing over the surfaces, is at a minimum. Since "skin friction" is noticeable even at very low speeds, at fair speeds of which the glider is capable, it is a very important factor. The glider is known to travel from 40 to 60 miles per hour when launched, and 12 to 20 miles per hour when in level flight. Air flowing over very smooth surfaces causes less eddies and disturbance than when flowing over rough surface. This determines the speed of a model since the smoother and more streamlined the glider, the faster it will be able to pass through the air. In turn, the height attained on the throw is determined by the model's highest speed, since the faster the ship itself, the higher it will climb before leveling off and going into its flat glide. The flying ability of the model itself therefore depends greatly upon its finish as can be seen, so that subject will be discussed. There are many good solutions on the market to be used in obtaining a smooth, glossy surface. There are two types of solutions: glider polish and wood filler. The wood filler is first to be used on the wings, tail and fuselage, which were previously finished off with 10 nought sandpaper. It has been found that a "Jasco" solution of wood filler and polish is one of the outstanding on the market, giving exceptional results. This is a creamy-like solution and is rubbed on with a brush and allowed to dry for ten minutes or so. After this it is sanded with slightly rough sandpaper. Then the latter, the finest sandpaper obtainable, is used to give a smooth, velvety finish. This procedure is repeated twice more before the final coat of glider polish is applied. This is administered to the wood and 10 nought is again used to finish it off . To make the whole ship glossy, rub down with a piece of flannel cloth and you will have a lustrous, velvety finished surface impossible to duplicate in any other way. When the glider has been fully assembled after finishing, the flying adjustments must be made. These consist of slight wash-in on the right wing (from rear), and slight left rudder. This should cause a wide left turn when the model is glided from about the height of the shoulders. (Just opposite adjustments for a left hander.) The turn should be wide because when the ship "hooks" into an up-current the turn will become tighter, encouraging a spiral dive, and this must be prevented. When launching the model, it should be held directly under the wing and thrown upward at an angle approximately seventy-five degrees to the ground, and banked slightly to the right. On the first few flights, until the model is well adjusted, it is advisable to hold back a little from full strength throwing. Later, when the "bugs" have been ironed out of the ship, (make sure this is done before a contest), give her all you've got and be ready for some cross-country work. The builder should experiment and find out how his ship performs under all conditions so that on contest day he will know just exactly what to do to make his model perform best. Although every glider has different flying characteristics, it is a decided advantage for the builder to know exactly how to launch his ship in relation to wind direction, banking angle, etc., in order to' get the best flights. Gliders in general act nearly the same when they are adjusted alike. Consequently, it has been found that with the usual adjustments of slight wash-in on the right wing and left rudder, the best way to launch the model is partly cross-wind with the wind striking the model on the right side. (Fig. 4). This allows the model, when launched with the right wing low, to bank to the right; the wash-in on the right wing pulling this side up before a half circle has been completed and bringing the ship into the wind at its maximum height. The model then slows down, going into its flattest possible glide, and gives itself the most possible time to drift into and be lifted by an up-current. This information applies as much for indoor gliders as for the outdoor type, except that there is no weight rule for the indoor ships. Therefore the materials selected should be as light as possible, yet have sufficient strength to withstand the terrific force of the launching. Care must be taken to make the fuselage very strong so that it can withstand the shock of landing heavily on wood floors before proper adjustment is made, and when it later encounters rafters, lights, etc. On these indoor ships the finish is of utmost importance and care must be taken to get a smooth one in order to stretch and flatten the glide as much as possible. If these suggestions are used for what they are worth, the beginner or inexperienced builder in the glider line will find, after he has built a few models of this type, that he will wish to put his own ideas on paper for the glider design. He can do so and will have a model which performs well. If these basic rules are adhered to a ship of any size or shape will live up to the expectations of the builder and help him "bring home the bacon" from many contests. Accompanying this article is a glider design which illustrates all the basic rules and theories given, and has been the veteran of many fine flights. Its best time, eighteen minutes, was made on a fine, calm day when it "hooked" into a riser and soared upwards to be later recovered three miles away. Its consistency, however, is its best characteristic and flights of over four minutes are quite common in suitable conditions. Build this steady flying ship and get your share of the thrills it affords a-plenty! Scanned From August, 1938
|