|
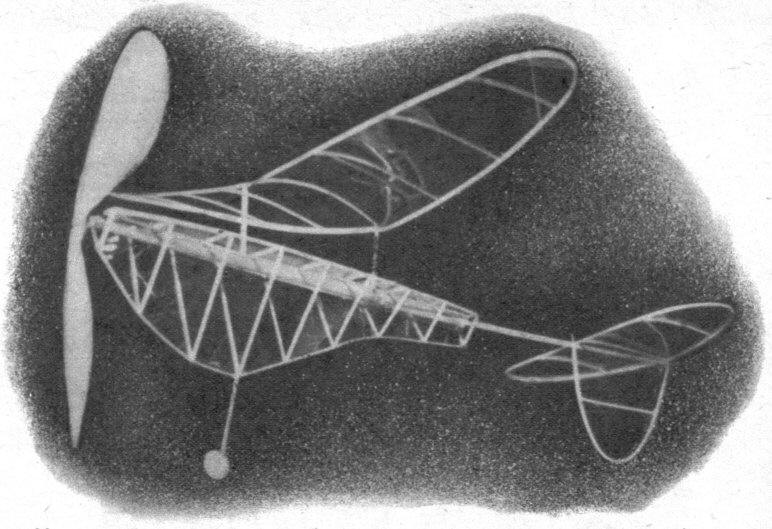
Tether Tractor Now it's R. O. R.-- Rise Off Rug -- as this indoor
fuselage model converts
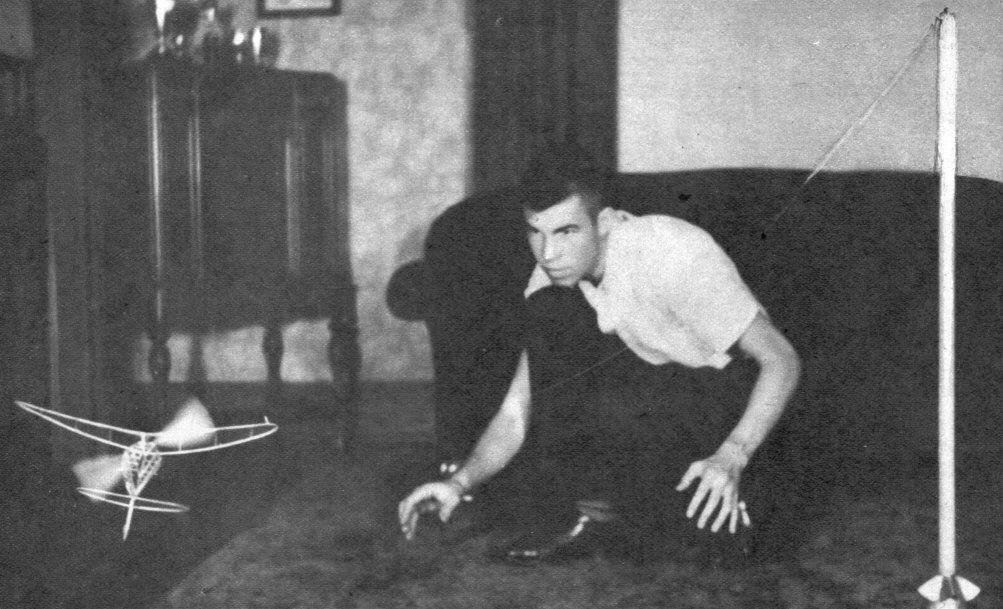
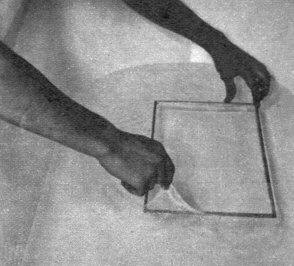
NO more need to search for that indoor flying site -- the Tether Tractor can be flown in your own front room. Already the model has made flights of nearly six minutes on a five-foot tether without exceeding an altitude of seven feet! Such performance is even within the reach of inexperienced builders because of simple construction and, some new tips on indoor building. About its history: The Tether Tractor was originally a contest baby R.O.G. which showed unusual flexibility. Its peppy climb proved to be a nuisance because it would invariably become hung up when wound to maximum. This was due to perfect power control during the initial burst, which resulted in a vertical spiral. Entered in its first contest in February, 1941, the model placed second in the Northwest with a hung-up flight of 5 minutes 45 seconds. It was still climbing when it hit the girders fifty feet up. At the Nationals, in the role of smallest cabin job at the meet, it showed no signs of slowing down, and was hung up three times before turning in a 7-minute flight to place thirteenth in senior cabin. Not bad for such a little fellow! On the tether the model will consistently turn in long flights. Try it and give exhibition flights for your friends, or hold club contests right in your clubroom and watch the attendance mount. If that armory is still available, give the boys some real competition in baby R.O.G. and cabin. Now for construction. CONSTRUCTION At the word "microfilm," many model builders shake their heads and give up. This is due to the mistaken idea that only experts are capable of making good film. If our method is followed carefully, even those who have never heard the word "microfilm" will be assured of success. The requirements are a clean bathtub, a good microfilm solution and a wooden frame. An excellent microfilm solution may be obtained at any drugstore. Ask for six tenths ounce of flexible collodian, five tenths ounce of amyl acetate; and three drops of castor oil, all in a two ounce bottle. To this solution, the builder should add enough clear nitrate dope to make two ounces of solution. A good frame for this model may be made of 1/4" square balsa, 10 x 15". Fill your bathtub to a depth of about five inches and allow the water to stand until it is still. Now fill a teaspoon about half full with microfilm solution and, holding the spoon about a half inch off the water at the center of the tub, pour it slowly onto the water, whipping the spoon away as soon as it begins to drip. When the sheet wrinkles around the edges, wet your frame and drop it lightly on top of the film and let it float there. This leaves both hands free to gather in the excess film and pull it over the edges of the frame. Due to suction, the sheet cannot be lifted directly off the water. Therefore take the frame by the fingertips and lift one edge gently, slowly rotating the frame and keeping one edge on the water. By gradually relieving the suction in this way, microfilm is easily lifted from the water. If you break several sheets, don't despair; it happens to the experts, too. The heavier sheets are usually blue or green, while the lighter ones are red or yellow. For this model try to get a red or yellow sheet, because it has less tendency to warp surfaces. If your sheet is too heavy, thin the solution with thinner. Now that you realize that making microfilm is not so difficult, let's start construction. Obtain the lightest indoor wood available because the spars are of sufficient size to withstand the strains of tether flying, and we want the model to be as light as possible. Cut the ribs from C-grain sheet, the spars from B-grain sheet. The wing tips are made separately and glued to the wing spars. An easy way to bend a balsa strip is to run it over your tongue until it is thoroughly soaked with saliva and then bend it over a hot light globe -- wear dark glasses -- to the largest radius, gradually increasing the curvature on the smaller part of the globe. It is most important to keep the strip under tension while bending by pulling on the ends so that it makes good contact with the curves at all points. The stabilizer is made the same way as the wing tips, the two halves being glued together at the center. Note that the D-shaped cross section of spars and tips facilitates bending. When the approximate curves have been obtained on the light globe, place the spars on the drawing and hold them in place with pins while gluing in the ribs. The airfoil on the rudder is cambered to give a left turn. The motor stick blank should be soaked in boiling water before bending it around a dowel. Starting at one end, bend the sheet around the dowel and tie it in place with a series of cloth strips so that the sheet is not twisted. When it has been heated over a burner or in the oven, it is removed from the dowel and the edges glued together. The 1/32" caps at the ends, the aluminum sheet thrust bearing and wire motor hook complete the motor stick. The prop is cut from sheet balsa, which is sanded down to paper thickness except at the center, where the prop shaft is anchored. After the prop has been balanced, the prop form block is then cut, and the blades are formed by holding them to the block with cloth strips and pouring hot water over them. Then the blade is heated until it is thoroughly dry. When one blade has been formed, turn the prop over and form the other blade on the same block, but be careful that you do not spill any water on the half of the prop already formed. The result is a stronger, lighter prop with identical blades which will not lose their pitch. After over a year's service, ours still has the same pitch. Before starting the cabin, cover the wing and tail surfaces. This is done by spraying the framework with water and dropping it on the mike sheet so that the edges stick. Sometimes the sheet is not flexible enough to allow sticking the whole framework at once. In this case, stick the trailing edge and trim it with a hot wire(heat over candle) to the tips. Then stick the leading sedge by turning the framework slightly. In trimming, leave about 1/8 of mike around the edges, which should be curled over the spars with your tongue. Put dihedral into the wing by cracking it at the center rib, raising the tips and gluing the breaks. A little heat will tighten the slack microfilm at the center. An important item is the system of attaching the wing to the motor stick. Some soft steel wire is bent around a dowel so that it will slide over the motor stick. These wing clips are pushed into the ends of the wing-mount spars, but are not glued in place. With this system the wing may be plugged on and off quickly without moving the clips. Now you have a baby R.O.G.; but wait, in a few more minutes the simple cabin can be made. On the plan lay out the balsa strips on the top view of the cabin. Then, with it still on the plan, glue on the uprights which form the triangular cross section, and finish the frame work by bending a 1/64" x 1/32" longeron along the vertices of the triangles. Cabin is covered by sticking as much of a side at a time as possible and trimming. The slit in the top of the cabin is made with a hot razor blade after covering. When flying a cabin job, wind the model up first, and then slip the cabin over the motor stick. A very important item which must be included is a crossbar which is glued to the rear wing-mount spar to keep the cabin on an even keel. This is shown end on in the side view. FLYING For tether flying, use a pole about three feet high with a five-foot tether and an eight-foot ceiling. A pin is put through some beads and pushed into the top of the pole, leaving about 1/8" of pin above the beads. The important problem in tether flying is to prevent the tether from wrapping around the pole. This is accomplished by making a wire arm from soft steel wire which is wound several times around the pin above the beads so that the wire stands out horizontally and turns freely. To the end of the wire a length of fine tungsten wire or silk thread split three ways is fastened. At the model end, connections are made by dropping a loop in the end of the tether over a balsa post at the wing tip in the position indicated on the plans. This system allows easy release of the model from the tether. Move the furniture out of the way and adjust the model for a left turn larger in radius than that of the tether. Move the wing back and forth as necessary to remedy a stall or a dive. On the tether, the R.O.G. was powered with a loop of well-lubed 1/32 " brown rubber 12" long, the cabin with 3/64" brown rubber 14" long. In the case of your own model, lengthen or shorten the motor depending on whether it is over or underpowered. A word about repairs. Since we fly our Tether Tractor constantly, it often gets a hole poked in the microfilm. This is easily patched by bending soft steel wire to the size of the hole and attaching film to it, trimming the film very close to the wire. Spray the patch with water and place it over the hole. The wire frame is easily removed. For comparatively few hours of work, the Tether Tractor will give you many hours of flying pleasure, regardless of whether you are flying in your own front room or in the Akron air dock. May you make many long flights with your Tether Tractor! Scanned From February 1942
|