|
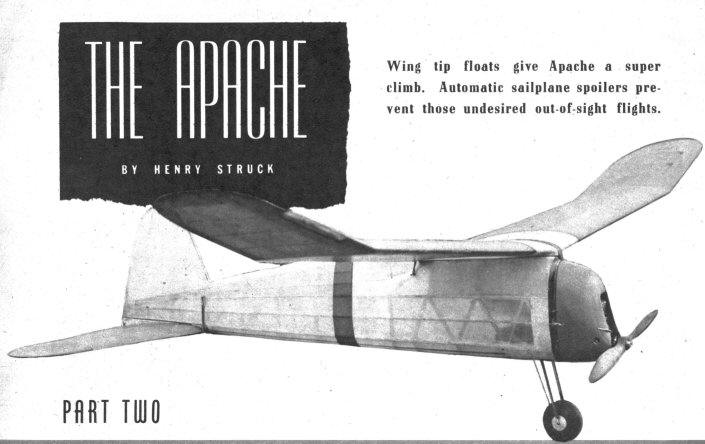
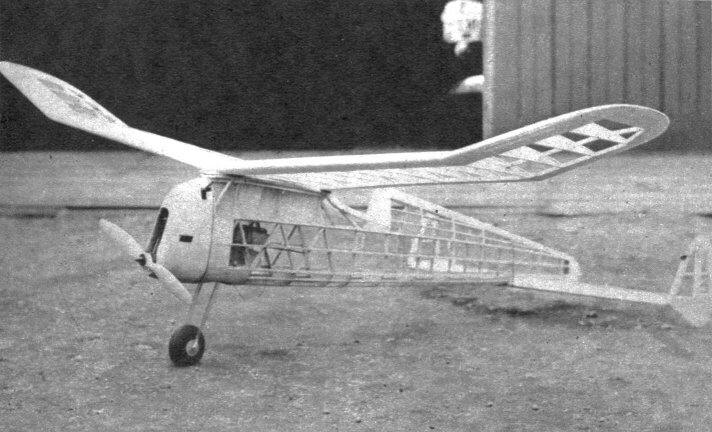
Tough warrior. The author's many years of intensive
competition are your LAST month we described the construction of the fuselage and motor unit in detail. It is advisable for those who wish to begin this ship now to secure a copy of this issue and catch up with the job. WING AND TAIL CONSTRUCTION As the wing and tail are identical in construction they will be described together. Make full-size layouts on which to work, using the scale given on Plate IV. Trace the shape of the tips from your plan onto 1/4" sheet balsa and cement the sections together. Carve the trailing edges to a triangular cross section and finish with sandpaper. Cut 1/16"-deep notches in them to, locate the ribs. Pin the leading and trailing edges to the plan to establish the outline. Trace the full-size ribs from Plate V onto 1/16" sheet balsa. Cement the ribs in place, setting them 1/16" from the top and bottom of the trailing edge to permit the cap strips to fit flush. When dry remove the frame from the plans and rejoin the panels at the correct dihedral angles, reinforcing the corners with gussets of 1/4" sheet. Insert the spars and reinforce their joints with gussets of 1/8" sheet. Trim the protruding corners of the leading edge flush with the ribs. Apply a liberal coating of cement to the front spar and pin the 1/16" sheet leading edge cover to it. Bend the wood over the ribs, moistening the surface slightly to facilitate bending, and glue it to the ribs and leading edge. Cover one panel at a time, straightening out any warps before the cement has set. Cement the cap strips in place and trim excess material from the leading edge. Smooth the framework with successively finer grades of sandpaper to remove any bumps that may spoil the finished surfaces. Trace the outline of the top of your fuselage onto 1/4" sheet balsa and cut out the wing base. Carve out the front of the wing base to fit the camber of the leading edge and cement in place. Install an auxiliary spar of 1/4" sheet at the rear wing spar, to support the wing base. Set the wing in place on the fuselage and check the alignment, sanding with rough sandpaper to give a true, solid fit. Insert short prongs in the largeface bushings cemented on the fuselage top and force the wing down on them. This will locate the position of the bushings to be cemented in the wing base. The stabilizer may be altered to take twin rudders by extending it to the outline indicated by the broken lines. The original ship was flown with both arrangements without a noticeable difference in performance. The wing slots can be easily installed. Cut across the top leading edge cover between W-11 and W-13 and drag this material down to meet the bottom cover. Cement a new sheet to the leading edge, adjusting its width to get an exit gap of about 1/8". Fair the underside of the slat with 1/32" sheet. The spoilers have been introduced into the Apache's design to eliminate the danger of losing your ship on a test flight. They are operated by a timer, either of the friction type illustrated, or by an air timer. By setting the timer they can be raised just as the motor cuts -- or perhaps a minute later, allowing some time to observe the glide unhampered. The spoilers when extended cause the airflow to break away from the wing. destroying the lift of the area for quite some distance around them. COVERING The center section of the wing may be covered with silk to withstand rough handling. Cut a piece of ample size, wet it and dope it to the frame. Apply extra coats of dope to the undercamber when the wood is dry. The rest of the surfaces are covered with red double tissue. Use fresh tissue to do a quick job and avoid wrinkles. Apply the first coat with the grain running chordwise. Cover the bottom of the wing first, taking care to dope the tissue to every rib to maintain the true airfoil shape. Spray the surfaces with water and apply a second coat of tissue when dry, with the grain running spanwise. Water again and apply three coats of dope, checking any tendency to warp. Polish between each coat with 10.0 sandpaper. COWL CONSTRUCTION Cement sheets of 1/4 x 2" balsa to the top and bottom blocks, A and B. These are 2 x 4 x 4", but can be glued up from any scraps you may have around. Allow the block assembly to dry thoroughly. Square up the back face and trace the shape of the fuselage front on it. Carve the outside to rough shape, being careful not to take too much off at the front and bottom. Dig out the inside to fit over the motor unit. A small gouge will do this well. Leave the walls about 1/4" thick. Finish the outside with fine sandpaper and cover with silk. Cut openings for the exhaust and the timer arm. Make a cut between them and hinge the resulting door with aluminum tubing and wire. Install a small rubber band in the cowl to snap the door shut after the engine has been adjusted. Glue a couple of small hooks to the cowl sides and a corresponding set at the sides of the fuselage, around which small rubber bands may be wound to retain the cowl. Color-dope the outside of the cowl and shellac the inside. ADJUSTMENT AND FLYING Attach the stabilizer by a couple of loops of 1/4" rubber and slip the motor unit in place. Balance the model by shifting the batteries until the center of gravity is located about 6-1/2" from the front of the wing rest. Mount the wing with about four strands of 1/4" rubber. Glide the ship to get the "feel" of it. Adjust the rudder till the model glides straight or makes a very slight turn to the left. Start the engine and get it running smoothly. Set the timer for about ten seconds and hand-launch. The Apache will climb steeply in a right circle. Now check the glide, bending the rudder to circle the ship in left circles of 100-feet diameter. Increase the negative angle of the stabilizer if the glide is a bit steep, or decrease it to correct stalling. Increase the engine speed, adding downthrust if the ship tends to climb too steeply and then "swoop" under the extra power. The Apache can withstand all kinds of misadjustment, guaranteeing ultimate perfect adjustment.
Scanned From July 1941
|
|||||||||||||||||||||||||||||||||||||||||||||||||||