|
VOYAGER
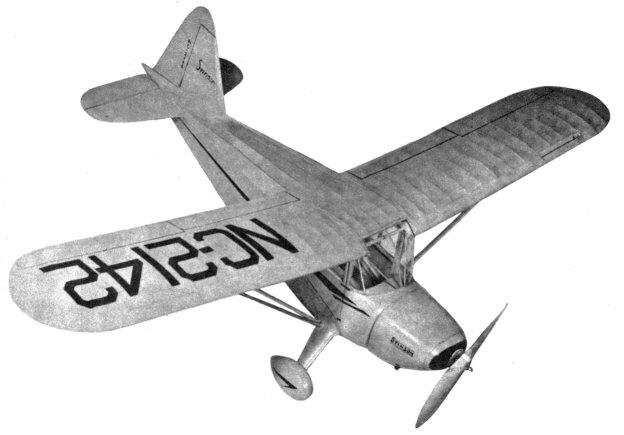
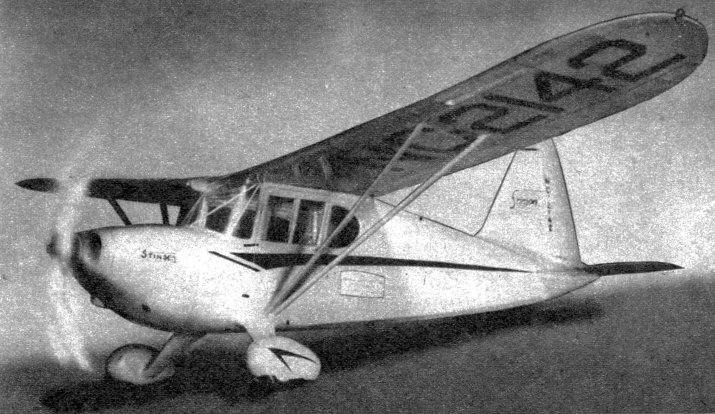
The Voyager is a simple model to build. Design of the
real Stinson's 1941 development of the famed 105 makes a trim high-performance flying scale model. So I decided on the Stinson 105 for a flying-scale model. Completed, the ship was fairly heavy (5-1/2 ounces), but balanced nicely and was quite stable in test flights, though tricky to adjust because of the scale tail surfaces. I would suggest that you use the larger flying stab, shown on the plan, if you want to get long flights. CONSTRUCTION For the fuselage, lay out sides, using medium balsa for 1/8" square longerons and stiff balsa for uprights. Doors may be made to open, if you wish. If so, make them fit snugly. Assemble the sides and add the formers on top and bottom. Cut Former A from soft 3/8" sheet, all others from 1/16" or 1/20" sheet. Now for some hard work. Using 3/32" very soft sheet, cut strips 1/8" - 3/8" wide, for use in planking the cabin. On the real ship this is metal-covered. Begin by planking the top, forward of the instrument panel, then the bottom. Fill in all the cracks with scraps, and sand smooth. The sides are planked with 2" sheets of very soft 1/8" sheet. Plank over the windows and cut them out later. Now add the top, bottom and side stringers. For a neater job sand each stringer to a triangle shape so only a small point will touch the covering. Cut the tail block roughly to shape, then carve and sand to fit the contour of the fuselage. It may be hollowed out for lightness. Attach the rear hook solidly and cement the block in place. Add two stiff wing ribs, spars, and rib X to the top of the cabin. Cover the area shown with 1/32" sheet that has been sanded smooth. Add the 1/16" aluminum tubing braces shown inside the windshield. To strengthen the landing gear, cut, bend and attach No. 12 wire as shown. Use scrap balsa to build up the struts and fillet, sand smooth, and rub cement into the wood, sand and repeat until a perfectly smooth surface results. Add instrument panel. Wheel pants are built up of 1/8" sheet. Note that the walls must be very thin in spots, to take a scale-size wheel. Carve the opening on the bottom of the pants as shown on the drawing. To prevent splitting, coat inside and out with cement. Do this repeatedly as you work, and finish the outside of the pants to a high luster. 1-1/4" air wheels or hardwood wheels may be used. The wheel must fit very snugly. Make a tail wheel fork from a bit of tin can, solder it, to a bit of piano wire and attach firmly to the fuselage. Attach tail wheel, using a pin or axle. Cut paper templates of top, side, front and rear of the engine block. Select a medium block of balsa to fit these templates. (Two blocks may be used.) Using the templates, carve and sand to correct shape. Cement the nose block to the front and carve it to fit. Check constantly with the drawing and templates, to get the correct shape. Cement a large-face bushing on the nose block. Now cut off the nose and saw the engine block down the center. Carve out the inside as shown. Cement a scrap block to the rear of the nose block. Make it fit snugly in the carved-out portion of the engine block. Finish the entire block smooth as you did the landing gear and pants. Add the detail shown. Carve the prop from a fairly hard block. Shape the blades first; then, using a razor blade, carve the spinner. Add freewheeling and finish smooth. Now for the tail surface. Cut rudder ribs and spars. Bend tip and trailing edge of aluminum tubing or bamboo. Assemble the rudder and cover the leading edge with 1/32" sheet. The stabilizer on the real 105 is plywood-covered, so to simplify the model I used 1/8" soft sheet for the stabilizer, sanded to a streamline shape and covered with tissue. Scale and flying outlines are shown. For the wing, make a metal template of the longest rib. Cut the required number of ribs, cutting slots for the leading edges and spars. Cut the odd-sized spars from sheet balsa. I used bamboo tips, but 1/16" aluminum tubing or balsa may be used. The wing spars should project a quarter-inch or so from the end ribs. These fit in the slots on the ribs built into the fuselage, assuring perfect wing alignment. When wing framework is finished, cut away the leading edge and insert the carved slot. When thoroughly dry, sand the entire framework smooth. Movable ailerons and flaps may be added, if you wish. COVERING AND FINISHING Use any material desired. I used light silk on the fuselage, and hakone tissue on the wing and tail. Apply the covering carefully. Don't allow it to touch anything but longerons, stringers, wing ribs and tips. Spray with water and apply thin clear dope until all pores are filled. Sand lightly with 10/0 and dope again. If you are not sure of the pores in the covering or wood parts being properly filled, give them a light coat of colored dope. When dry, it will show where fill-in is needed. Now for that super finish. Don't rush the job. Use Berryloid regular pigmented dope. I used Stearman vermilion trimmed with black, but any color scheme will do. Thin the dope slightly, then apply three coats to wings and tail, seven or eight coats to fuselage and wood parts, letting each coat dry before applying the next. Check to see if all pores in wood and covering are closed. Now sand lightly with wet or dry sandpaper, wetting the surface occasionally. Wipe clean and apply auto rubbing compound with a soft rag. Do this slowly and wet the surface occasionally. When all parts take on a smooth luster, you will notice that the dope is rubbing off in spots. Wipe the surfaces clean and apply several more coats of thin dope, until all parts are evenly colored and smooth as glass. Give it another rubdown. As many as twenty coats may be applied to the fuselage and wood parts. Be careful when rubbing the wings and tail - don't go through. Decorations and detail may be applied with thinned colored dope flowed on with a ruling pen. By rubbing talcum powder into the surface, India ink will stick, but must be coated with clear dope. Windows are .005 celluloid. The edges of the windshield are 1/16" wide strips of celluloid painted and cemented in place. A strip of celluloid 3/8" wide may be painted and carefully cemented over each fuselage wing junction, on top. The real ship has a metal strip over this junction. In assembling, attach wing to the fuselage. The spar ends fit in the slots cut in the center section. Cut the wing struts to correct length and cement in place. Cement the stabilizer in place, at 0° to the thrust line. Attach the rudder and cut silk to fit the fillet shape. Apply it wet, pulling out all wrinkles. Dope and paint the fillet. Finish as you did the other parts. Cement the engine block in place. Make up a rubber motor of six or eight strands of 3/16" brown rubber, well lubed, and bind it to the prop shaft and rear hook. A small opening may be cut at the rear of the fuselage to permit changing the rubber motor. To keep the finish from getting dull use any wax in paste form, applied with a soft rag and rubbed to a high gloss. This should only be done on the completed model, because the wax may retard the drying of any cement or dope that may be necessary in assembly. You may have noticed that I omitted much of the usual instruction, but I'm taking it for granted that you can "wish" some parts to their proper shape, the idea being to keep working on the particular part until you are satisfied it is right and that it conforms to the drawing. Adjust and fly the model in the usual manner. Test hopping can be done safely in tall grass on a calm day. Good luck!
LIST OF MATERIALS
Scanned From November, 1941
|