|
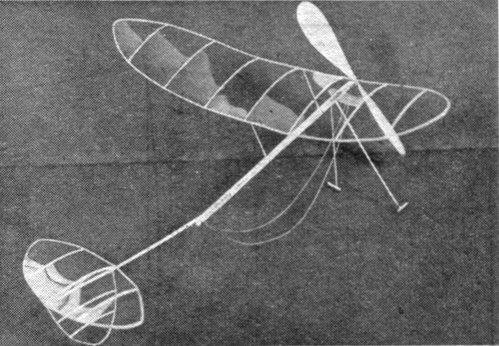
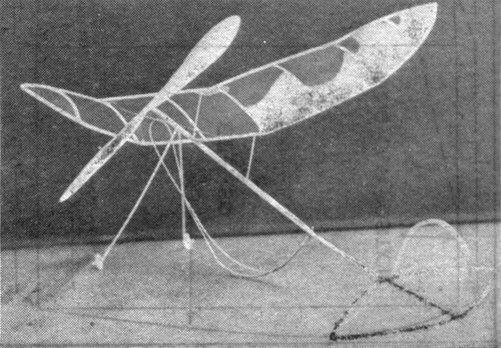
MICROFILM-COVERED R.O.G. by Leon J. Friedman and Arthur Ruthlein Plans for two indoor endurance jobs suitable for a beginners' model program.
HAVE YOU EVER sat home on the day of a contest with your models packed and ready to go and could not because the weather wouldn't permit outdoor flying? In such a case, either of the models presented here will provide a "salve" to the builder's feelings. To steal a phase from the Post Office Dept., "neither rain, nor snow . " shall stop the modeler from flying one of these ships as long as he has a fair sized room. The author has done 2 min. 10 sets., in his parlor, which is very small, with the "E-Z" model. The advanced model is slightly more critical in its adjustments and necessitates flying in a larger circle, and therefore is not perfectly suited for flying in a very small room. No one can truthfully say he is an expert model builder unless he has tried his hand at building indoor models. The ships presented here are for the purpose of acquainting the builders with a very simple indoor model which is built fundamentally the same as any record job, yet which a builder may make as his first indoor ship. This job we have called the "E-Z". We also present a real contest ship built along the same lines, which we call the "E-X". The "E-X" should be capable of at least 12 mins. 30 secs. Our "E-Z" ticked off a consistent 10-1/2 minutes every flight. This time in itself is not so remarkable but one must take into consideration it was not built for contest work and the weights were not watched. The economy of construction is really amazing with these models as both of them won't cost you more than thirty cents. Well let's get down to building it. The "E-Z" is suggested if you have never built an indoor model and the "E-X" if you have built one before, or if you want to built it after finishing the "E-Z" and acquaint yourself with indoor construction. PROPELLER, MOTORSTICK, AND WING FIRST AND MOST IMPORTANT item in an indoor job is the propeller, for the basis of all high time and consistency is a light, well balanced, smooth, efficient prop. If desired, an 8" indoor machine carved prop may be used but these are hard to obtain. The best idea is to carve it from a block of very light balsa 8" by 5/8" by 7/8". The block is marked out and cut down to an "X" blank. Carve the undercamber first on both blades and then carve the top. The prop is sanded with 6-0 sandpaper and then finished off with 10-0 sandpaper. The shaft is then glued on. Completed it should weigh about .004 oz. For the "E-Z" model a solid stick 1/8" by 1/16" by 8" of very hard balsa is used. The ends are tapered and sanded and the hook and bearing are cemented on firmly. A hollow motorstick made of 1/64" sheet sanded, 9/16" in width and wrapped around a piece of dowel is used on the "E-X". The ends are capped with 1/64" sheet and the bearing and hooks glued on. The indoor wing construction is very important and is quite different from outdoor types. The "E-Z" spars are cut from 1/20" sheet and sanded until it tapers from 1/20" at 8" from the front to 1/32" at the end. When you take the ruler to cut the spars you cut so that it tapers the same in the top view. This is the method that all tapering is done on indoor models. Four spars are made this way for the "E-Z", tapering from 1/20" square at the center to 1/32" square at the tip. There are four spars to be made for the "E-Z" but these are made a little differently A center spar 31/2" long is made by the same method, tapering from 3/64" by 1/32" at the center to 1/32" square at the next rib. The wing tip spars are made by sanding 1/32" sheet at the center to 1/64" and tapering to 1/32" at the ends. The cut is made to have a spar 1/64" square at the center and 1/32" square at the tip. For the "E-X" a template must be made of the wing tip and the spar wrapped around it wet. The "E-Z" may be laid out without bothering with templates. The spars are laid directly on the plans and glued together. Ribs are made by cutting a template of cardboard or aluminum and placing it on a sheet of balsa; the size for the "E-Z" ribs is 1/32", and for the "E-X", 1/64". By moving the template down either 1/32" or 1/64" and cutting along it again, a rib is cut out. The leading edge of the rib is glued to the spar and the trailing edge of the rib is cut to fit and then glued. The wing clips are glued on firmly and you may use wire or aluminum for the "E-Z" and aluminum only for the "E-X" to hold the wing to the motor stick. TAIL, AND LANDING GEAR THE CONSTRUCTION of the tail is very simple and for the "E-X" much the same as building the wing, except the spars aren't tapered but are made of 1/64" square which is made by cutting from 1/64" sheet balsa. The "E-Z" is just an outline of 1/32" square. The rudder on the "E-Z" may be made right on the tail boom which is made like the spars of the wing. The rudder is first covered and glued to the tail boom and then both are glued to the side. The landing gear struts are also made the same way as the wing spars from tapered sheet balsa. The wheels for the "E-Z" are made of 1/64" sheet sanded to 1/100". A small piece of .010 wire is glued to the struts and a piece of tissue is wrapped around a pin, glued and cut in half and used as a tube through the center of the wheel. Another type of wheel is made of a thin strip of celluloid about 1/32" wide glued in a circle with a center brace of 3/64" by 1/32". The paper tube may also be used here as an axle if desired. The landing gear is glued to the body about 1-1/2" from the front and about a 4" tread. MAKING MICROFILM AND COVERING IF you have never tried making microfilm don't be frightened at the thinness of the stuff as microfilm is really easier to cover with than tissue. If desired a sort of makeshift microfilm can be made from either dope or lacquer; made flexible with a few drops of castor oil. The amount of castor oil is determined by experiment; that is, add a few drops of castor oil to some dope or lacquer and pour on water. If the stuff spreads out nicely and after awhile starts to crinkle around the edges, you will have to add more castor oil. If you add too much oil you will find either you can't pick the film up with a hoop of wire or that it becomes too tacky and sticks to everything it touches. There are many commercial formulas for "mike" which will save all this bother. A hoop of wire is needed. It may be an old clothes hanger bent to shape or 1/16" galvanized iron wire which can be obtained anywhere, or 1/8" aluminum wire which is the best. About 3 inches of water should be run into either a bathtub, tank or wash basin top. For the beginner, it is best to use cold water as this produces heavy "mike" which is much easier to handle. The solution is poured on the water, and after about three to five minutes of drying, a hoop is placed over the "mike", the "mike" pushed to the edges of the hoop and lifted in a semi-circular motion away from you. A knack of lifting will be acquired with a little experience. Probably the best way to cover is to lay the uncovered parts on an enameled surface and draw a wet finger around them, leaving them completely encircled by water. Then wet the frames with saliva and place back in position. If the hoop of "mike" is then placed over the parts it will stick to the wet enameled surface and to the structure. Another way is to rest the hoop on four bottles and, place the frames wet, right on it. The mike is trimmed with either a hot wire or a brush with acetone or thinner. Dihedral is then put in the wing and to get the wrinkles out a hot wire is passed beneath it. If the ship is made to fly in a small room, it is advisable to glue the boom on at an angle to give the model left turn. Assemble the ship and put in about a 10" to 12" loop of 1/32" flat brown rubber. Place the wing in position so that it glides flat. Put in about 500 turns and launch very gently. All adjustments should be made with the tail. The "E-Z" should be able to fly in a very tight circle but the "E-X" may be a little more difficult to fly in a small place. Make sure the windows are closed. THE END Scanned From July,1942
|