|
THE DUCK BY LOUIS GARAMI
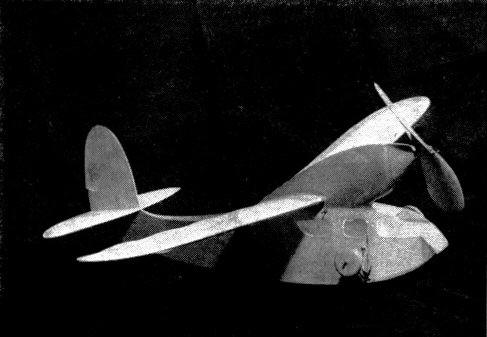
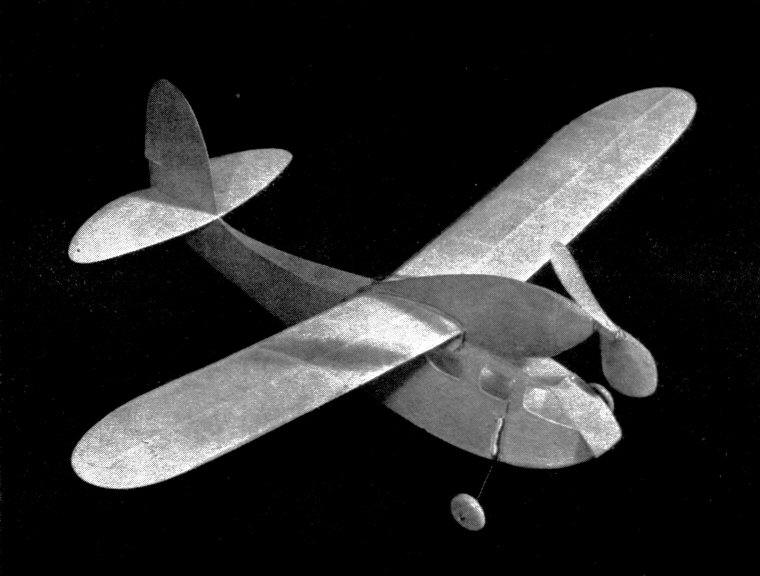
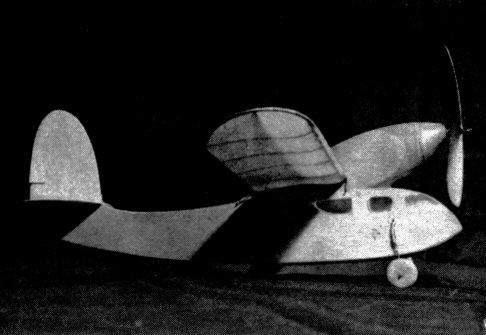
With the exception of the multi-motored ships, an amphibian is regarded as one of the toughest to adapt for rubber power. The numerous problems in designing which pop up here and there are all out of the ordinary and even the necessary flying adjustments seem to go against one's previous experiences. The main problems are to secure a normal length of concealed rubber line, safe prop clearance with a normal size prop, and an easily retractable landing gear for water take-offs. In the past few years I have made several attempts to produce a good flying amphibian, but for some reason they all wound up far too complicated to attract the average builder. The first models had a regular crankshaft transmission with the propeller constantly shaving the imaginary pilot's head in the open cockpit. Later on a single universal joint would do, but at the same time it would scare away the interested builder. And then came the "Duck." There are no mechanical gadgets to coax into action here, which, while taking most of the romance out of it, places this amphibian within the ability of the average sport modeler. The unusual features are the tissue-covered sheet balsa body and tail for waterproofing, the built-in up-thrust to overcome the tendency of diving, and a very simple retractable landing gear. And now you may ask the often-heard question: But how does it fly, mister? Excellent, my dear chappie. But definitely. BODY AND NACELLE The body and nacelle are made of 1/32" soft sheet balsa. First cut out two of No. 1 and No. 3 blanks and one of No. 2 blank. Now cover these with Jap tissue on one side. Make sure that a left and right blank is obtained of each twin. In addition to these cover a whole sheet of 1/32 x 2" the same way to provide for the top and bottom of the body. The best way to cover with tissue is to brush dope on the whole surface, lay an oversize tissue on top and smooth out with the palm of the hand. To counteract the strong warping tendency a coat of dope should follow on the other side, and when both sides are dry the tissue is trimmed with a razor blade. Now prepare the four formers (FA, FB, FC, FD). FA is a triangular block of wood forming the nose of the body. Cement the rear hook on FD before assembling the two sides. First pin and cement the two sides to FA. When the glue has set put the other formers in one by one and lastly pull the top of the tail together and cement. Bottom blank No. 3 is fitted in between the two sides, thereby shaping the bottom of the boat from the step on. All the other pieces needed for the body are just oversize pieces of wood glued on to the sides and trimmed after. The whole top can be made easily out of one piece, but the front end of the bottom requires four pieces. Two pieces between formers FC and FB, and from FB to the very nose, two other pieces, with the grain running right-angle to them, are required. Trim and sandpaper the edges smooth. Now dope a strip of tissue along each corner to cover up and strengthen the joints. Proceed to cut out all the openings. Cutting the window shapes out of a different color tissue and doping in their places on the body makes the razor-blade work easier and neater. Next the landing-gear struts are bent. Do not forget to slip the aluminum tubings on first. They are glued on FB (several coats) through the side windows. Now you can cover the windows with celluloid, fasten small hooks for the landing-gear rubber bands, also the two straight wires through the top which hold the rubber bands for the nacelle. The wheels and water rudder are made of light balsa and waterproofed by several coats of dope. The slight bulge of the nacelle sides is the result of an extra coat of dope on the uncovered insides. First the top seam is pinned and cemented, then the bottom former FE and the solid balsa front piece are added. Two wire pins fix the nacelle to the body. Place the nacelle in position on top of the body and press lightly to mark the position of the pins. Now enlarge the two holes and glue a square piece of sheet aluminum, also punctured, to coincide with the holes. The two-piece nose plug is fitted and carved to shape. The bearing is a copper washer and small bushing in the front and rear of the nose plug. Cut the propeller out of medium-hard balsa. Waterproof with a couple of coats of dope, colored or otherwise. Fit in the same bearings as on the nose plug, and make sure that it is equipped with your choicest freewheeling. Use six strands of 1/8" flat rubber for motive power. It is important to lubricate the rubber, because going through the body it sometimes rubs slightly on the wood. For this reason the rubber should be put in the body and the prop tried for smooth run. If too much vibration results the cause may lie in too small a hole on top of the body or bottom of the nacelle. Or a too-large hook on prop shaft striking the sides of the nacelle will cause uneven run. WING AND TAIL Cut out ten ribs, two of which are 1/4" thick. These are placed first as wing roots, and later on carved to fit the side of the nacelle. The wing is made in two halves. Fix the two end ribs of each wing to the leading and trailing edges and set the remainder and the spar in after. Bend a 1/4" wide bamboo into the shape of the tip above the gas range and slice two 1/16"-thick pieces off with a knife. Upon finishing the wing frames, cover them with tissue, spray with water and dope once. The tail surfaces are of 1/32" sheet balsa. Cut out the exact shape and smooth the surface with fine sandpaper. Cover both sides with tissue the same way as the body has been. With the tail surfaces fixed in place, the center of gravity should fall to a spot five inches from the nose. Set the wing so that this spot coincides with the wing spar, not forgetting the proper incidence and dihedral. FLYING A rough adjustment can be accomplished indoors, in the cellar, or even a large-size room with pillows placed at the probable landing spot. Ten feet of gliding is ample distance to show a stalling or diving tendency. Warp the elevator flippers to correct anything but a flat glide. Do not rush outdoors regardless of the weather; wait for a calm hour and save yourself a lot of trouble. For outdoor adjustment I recommend 1/16" right rudder and an equal amount of right thrust on the nose plug. Wound to capacity, which is four hundred turns, it will take off from water or land alike.
Scanned From August 1939
|
||||||||||||||||