|
Building a Consolidated PB-2A By PAUL W. LINDBERG Model Editor and Designer for POPULAR AVIATION
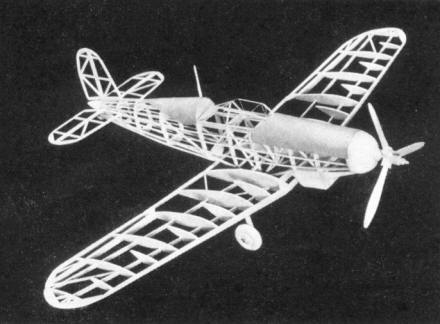
OUR consolidated pursuit model for this month maintains high speed and exceptional maneuverability. If you follow the plans closely and carefully, you will be well paid for your efforts with a beautiful streamline model. COLOR SCHEME Fuselage - Army blue. CONSTRUCTION OF FUSELAGE Place a sheet of ordinary wax paper over your plan for protection against cement. Now you are really to go to work on your model. We suggest that you begin with the fuselage which is constructed one side at a time. The longerons, vertical and diagonal braces etc., are held in place until securely cemented. This is done by inserting straight pins on either side of strips. When fuselage sides are completed, they are pinned to top view of the plan in such a manner that the top longerons face down and the sides are at right angles with the table. The cross-members are now cemented in place forming a rectangular fuselage. Cut formers from sheet balsa and cement in their respective positions. Refer to plan. The positions of stringers are clearly shown on formers. Note: all stringers pass over tops of each former. If you follow this method, you will obtain a neater covering job. CONSTRUCTION OF WING This wing is made up of three separate panels. Cut all ribs from 1/16 - inch balsa. Pin the spar in position on the plan. Now, cement ribs in their proper locations. The leading and trailing edges are cut and sanded to shape then cemented to the ribs. The panels carry movable ailerons which are a great help in controlling the flights. Make wing tips from 1/16 - inch thick balsa. We highly approve of this type of wing tip, because it is much easier to construct and neater in appearance. CONSTRUCTION OF ELEVATOR AND RUDDER These are made 1/16 - inch square and flat balsa and are constructed on the plan. Their construction is easy, therefore you should have no difficulty here. CONSTRUCTION OF LANDING GEARS The construction of landing gear is clearly shown on the plan. COVERING THE MODEL Apply tissue to the various framework members. Use a light grade of model airplane dope to fasten tissue to the outer edges. Stretch tissue tightly as possible to remove all wrinkles. When edges have dried, apply coat of water to tissue. After water has dried completely, tissue will become taut. To prevent warping pin wings, elevator and such to flat surface. ASSEMBLY After the wing panels have been cemented to fuselage, make fillets from paper and fill in open spaces between fuselage and wing panels at trailing edges. Other small details are clearly shown on the plan. TESTING AND FLYING Two types of propellers are used on this model. One is made of fiber which has a much wider blade causing the rubber motor to turn at less r.p.m. and enabling the model to fly a greater distance. By twisting the blades, the pitch can easily be adjusted. The balsa scale propeller is used for exhibition purposes only. Six strands of 1/8 – inch flat rubber are sufficient to fly the model. With the rubber motor and flying propeller in place, gently launch your model over tall grass to see whether it is properly balanced. If model glides a short distance and nose rises abruptly, it will be necessary to add weight to bottom of nose block. If model dives, add weight to tail. After the model is balanced to glide at an even angle, you are ready to test your model under power. In making the test flight, the principal thing to avoid is damage to your model. Gliding and flying it over tall weeds is the safest, because the weeds or tall grass break the fall gently in case that the model should stall or dive. A few trial flights will acquaint you with the ship. END Scanned From February 1937 |

