|
Building the Mew Gull by PAUL W. LINDBERGModel Editor and Model Designer for POPULAR AVIATION
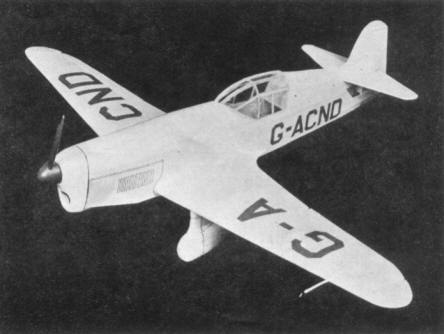
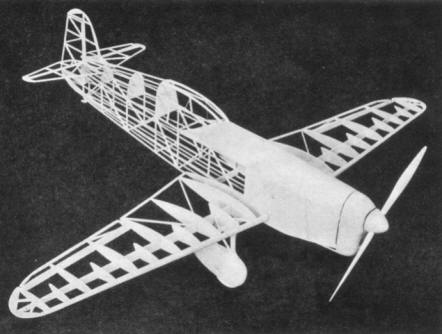
THIS trim ship is of English design, and it is capable of very high speed plus exceptional maneuverbility. In our laboratory we enjoyed many interesting hours constructing the Mew Gull because of its simplicity and unusual clean lines. All controls are movable with aluminum hinges. False ribs can be cemented in the panels where necessary. COLOR SCHEME Entire model -- white. Details -- red, silver and black; with exception of identification numbers which are turquoise blue. Rudder -- carries a red number 2. CONSTRUCTION OF FUSELAGE It is necessary to place a sheet of ordinary wax paper over the plan to prevent cement from sticking to it. In building the fuselage, construct one side at a time. The longerons, vertical and diagonal braces, etc., are held in place until securely cemented by inserting straight pins on either side of strips. After the two fuselage sides are completed, they are pinned to top view of the plan in such a manner, that the top longerons face down and the sides are at right angles with the table. The cross-members are now cemented in place forming a rectangular fuselage. Cut formers from 1/32 - inch sheet balsa and cement in their respective positions as shown on plan. Select a soft piece of balsa for nose block which you carve and sand to shape. Stiff paper is needed for covering the fuselage around motor and top of fuselage to cockpit. The position of all stringers is clearly shown on formers. CONSTRUCTION OF WING Cut all ribs from 1/16 - inch balsa. Pin center spar in position on plan. Cement ribs in their proper locations. The leading and trailing edges are cut and sanded to shape then cemented to the ribs. The wing panels carry movable ailerons, which are a great help in controlling the flights. Make wing tips from 1/16 - inch balsa. ELEVATOR AND RUDDER These are built on the plan from 1/16 - inch square and flat balsa. Their construction is very simple, therefore, no difficulty should result here. FILLETS The wing fillets are made from stiff paper and cemented into position on each side of fuselage. Angle is not required. LANDING GEAR To assure best results, may we suggest that you select a strong grade of balsa for the struts. These are fitted to the streamline wheel coverings and reinforced with short lengths of wire. Refer to plan. The wing panel is reinforced at rib H to receive upper part of landing gear strut. SEE PLAN. COVERING THE MODEL Apply tissue to the various framework members. Else a light grade of model airplane dope for sticking the tissue to the outer edges. To remove all wrinkles, stretch tissue tightly as possible. When edges have dried, apply coat of water to tissue. After water has dried completely, tissue will become taut. May we suggest that you pin wings, elevator and such to a flat surface to keep from warping. Now apply a coat of clear dope to all surfaces. Colored dopes should be applied next. Do not assemble model before covering with tissue. Wings, elevator, etc., are cemented to fuselage after they have been completely covered with tissue. ASSEMBLY The wings, elevator, rudder and landing gear, etc., call be cemented in their correct positions. The cockpit covering is made from wire and celluloid. Shape wire to correct form and cover carefully with celluloid. All other details and markings can be drawn with pen and ink. TESTING AND FLYING Two types of propellers are used on this model. One, which has a wide blade, is made of fiber. This type of blade causes the motor to turn at less r.p.m. and greater flights result. By twisting the blades, the pitch can easily be adjusted. The balsa scale propeller is used for exhibition purposes only. Six strands of 1/8 - inch flat rubber are sufficient to fly the model. With the rubber motor and flying propeller in place, gently launch your model over tall grass. By this method, you can see if your model is properly balanced. If model glides a short distance, and nose rises abruptly, it will be necessary to add weight to bottom of nose block. If model dives, add weight to tail. After the model is balanced to glide on an even angle, you are ready to test your model under power. In making test flight, the principal thing to avoid is damage to your model. Gliding and flying it over tall weeds is the safest, because the weeds or tall grass break the fall gently in case that the model should stall or dive. A few trial flights will acquaint you with the ship, and all other adjustments can be made through the adjustable control surfaces. END. Scanned from April 1936 |

