|
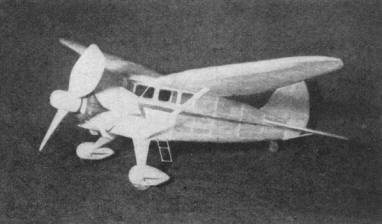
Gull-Winged RELIANT Detailed plans for building a ragged flying model of the Stinson for 1937 --- a realistic display model and an excellent flier By Alan D. Booton
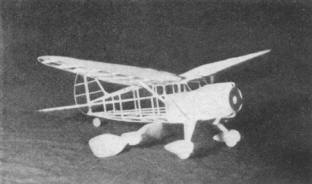
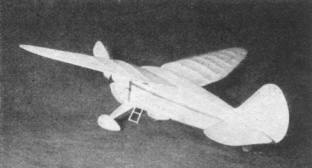
The 1937 Reliant is almost the same as the 1936 Reliant, with the exception of the changed cowl and rounded windshield. It is available in 5 models, depending upon motor anti equipment required. In designing the model, the simplest design has been adhered to and yet scale proportions have been maintained. FUSELAGE Select 4 fairly hard 1/16" sq. strips for the main longerons. Include the 1/16 " sheet wing mount in each primary frame, but leave off the 1/16" sq. stringers until the formers have been cemented into place. The primary frames start at # 1 end with the short tail posts. The round bulkhead is added, along with the 3/16" beams, 1/16 x 1/8" and 1/16" sq. longitudinal braces, Sand the forward portion carefully to round off any protuberances and cover back to #2 with 1/32" sheet, and frame in the windows as shown. The "bill" or extension over the cabin that the top of the windshield attaches to is carved and hollowed from a balsa block, since sheet balsa could not be bent perfectly enough. Cement 1/32" sq. bamboo strips in the slots on top of the fuselage and the 2 1/16" sq. stringers in the slots along the bottom. Then cover the bottom edges with 1/64" sheet, between the lower longerons and the bottom stringers. Cement in the rear hook and the stabilizer rest. LANDING GEAR Carve the fillets carefully and streamline the struts. Make the struts from 1/2" to 1" longer if a longer propeller and flight is desired. Carve the pants from blocks and split them open to hollow. Cement the parts to the fuselage with the aid of short lengths of wire or bamboo. Attach tail wheel. WINGS In making one of these wings it is best to mount the ribs along the main 1/16" sheet spar and then block up the leading and trailing edges with blocks of varying thicknesses. Arrange all the parts and use plenty of pins to hold them in place. Some prefer to leave the ailerons and cut in for the spars and extra ribs after cementing all the parts, in which case, go ahead. The 1/64" sheet leading edge is cemented on after the frame is removed from the board. Pin the finished wing frames to the fuselage in the position shown and cut struts to provide the proper dihedral and cement them to the wing only, while in this position. In doing this, the wings can be attached easier after covering. TAIL SURFACES Assemble the tail surface frames, using unshaped 1/32 x 1/8" stock for ribs and sand them to shape after the assemblies are dry. Copper wiry or aluminium sheet makes ideal hinges for all movable surfaces. COWL AND PROPELLERS For this model, a carved solid block proved to be the most suitable for the desired balance, shape, and ease of making. Carve and hollow the block to the size and shape shown and then add the valve cover bumps. Attach the finished propeller to a conventional nose plug with washers for bearings. FINISHING THE MODEL Cover all the frames with tissue. Spray the covering before doping, pinning the tail and wing to the bench until dry. Cement the wings, cowl and tail surfaces in position on the fuselage and dope. The original model flew well on 4 strands (2 loops) of 1/8 " flat rubber. Make the first flights in tall grass by hand launching. MATERIAL LIST
Scanned from September 1937
|