|
A CLASS "D" STICKER High Performance Plane for Contest Flying BY JAMES NOONAN
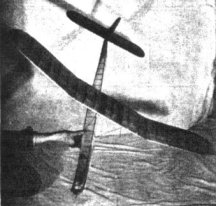
THOUGH this stick model was built from the remains of other models, it has proved to be better than any other similar job the author has ever constructed. Its flight is characterized by a rocket-like climb and a very slow, flat glide; a folding prop and low drag giving it these qualities. The plan is quarter-size so the first thing to do when starting construction is to draw a full-size layout of the wing, fuselage side, rudder and stabilizer. The method of constructing the various parts follows WING: 5" chord, 42" span. Cut the full size pattern of the wing rib from the plan and cement it to a strip of metal, cut from a tin can. Cut it out carefully and file smooth. Punch two holes in the template with a nail. This causes the tin to form burrs which stick to the sheet balsa and permit the making of perfect ribs without sanding. Cut twenty ribs from 1/16" medium sheet balsa. Assemble the wing on a flat surface and when dry sand the leading and trailing edges smooth. Bend the tips from a thick piece of bamboo and cut off the tips as you need them. Cut the wing into three 14" sections and cement to the proper dihedral angle. Reinforce the scraps of 1/16" sheet at the joints of the main spar.Cover the wing with the grain of the tissue running along the ribs (chord-wise). To give a smooth job, stretch the paper tightly along the chord. Dope it with three coats. FUSELAGE: Build the fuselage of 1/8" square hard balsa. Lay out two sides then assemble, using the side view as a top view. Fill in the nose and tail sections with 1/16" sheet. Carve a nose block of hard balsa. The tail plug is detachable and the rear hook is fastened securely to it. Make the wing mounts, but do not attach them. Cover the fuselage double, crossing the grain of the tissue. Dope this five times. The nose and tail plugs are held in place by small hooks and rubber bands. EMPENAGE: The stabilizer is built and covered in the same manner as the wing. Assemble the rudder roughly, using balsa if you have no bamboo on hand. Sand it to a streamline section and cover. Be careful to check for warped tail surfaces. PROPELLER: Blank out the propeller as shown in the drawing. Carve it in the usual manner, using 3/16" under-camber. Cut the outline of the blades to a pleasing shape, sand and balance. Give the propeller ten to fifteen coats of dope.To make a folding prop, cement a string of brass 1/2" wide along the back part of the propeller hub. A piece of 1/16" diameter wire is bent into a U shape and attached to the blade. The brass is bent over the wire and soldered, forming a hinge. Bind and cement these parts to the prop. Cut the blades from the hub and move the blades back and forth so they move freely. A drop of oil will help. If your prop does not fold when the motor is unwound, two small hooks attached to the blades, with a rubber band between, will make it snap back and stay. A rubber tensioner is not needed. Use 1/16" diameter prop shaft and rear hook. ASSEMBLY: Cement the tail surfaces to the fuselage, at zero degree incidence. Attach the rubber motor, (18 strands of 1/4", brown) nose block and prop assembly. Then balance the assembly; noting that the trailing edge of the wing should be 1/2" ahead of the balancing point. Now cement the wing mounts in place, binding them to the fuselage with thread. FLYING: Lubricate the rubber and see that the propeller rotates freely. Attach the wing, fold the prop. Warp the rudder for a slight right turn and test glide the model until a slow, floating glide is obtained. When power-testing, use right thrust (very little); no down-thrust is needed. Do plenty of test flying before using your model in a contest. When winding for long flights, stretch the motor as far as possible and "pack in" the turns. Launch the ship upward in a slight right bank and start running. The author has obtained flights from two to five minutes in dead air and finally lost the model in a clear sky!! Good Luck !!
Scanned From July 1940 |