The Plan Page
[ Home ] [ Previous Plan Pages ]
[ Special Things ] [ Earl Stahl Plans ]
gt-hunter1@home.com
Here's a Gas Model That Made a World's Record for
Duration and Weight Lifting -- How You Can Build It
By CHESTER LANZO
|
|
|
TO PRODUCE a consistent championship gas model, a ship must possess these two main flight characteristics.
Ability to Soar: Any ship will climb with a powerful riser "slamming it skyward," but to have a model take advantage of the slightest trace of a thermal and produce a long soaring glide is to have soaring ability.
Climbing Ability Under Power: Utilize every erg of energy in the motor to make the most of the limited run. Every foot of altitude gained in the climb is minutes added to the total length of the flight. Get the model high enough where the more active air currents will affect the ship.
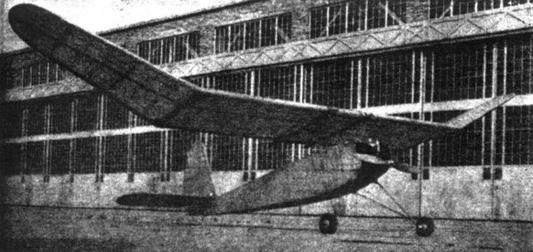
This model has proven to have both of these characteristics to an amazing extent, plus an extreme in stability. In fact it is so stable that it can be made to circle right or left under power or in the glide without having to warp or twist the wings. As a weight‑lifting or a radio‑control job it cannot be beaten. This model won the Scripps-Howard contest for lifting the greatest weight and then remained in the air for the greatest length of time.
During a recent gas duration contest, with a motor run of 21 seconds, the plane remained aloft for 25 minutes. Upon returning to the field the ship was sent up again with a motor run of 25 seconds. This produced a flight of two hours covering a distance of 25 miles, and incidentally established a new world record.
This plane also incorporates the following desirable features: detachable wing, adjustable rudder and elevator, crash-proof wire landing gear, flexible wire wing mount to eliminate wing breakage and to produce greater stability.
All of the excess frills and baggage are entirely eliminated, thus producing a straight-forward and simple but efficient design. Quoting one of the best model builders in the country, "Super-streamlining has a tendency to induce complicated and heavy structures."
Constructing the Plane
Start out with the intentions of spending two or more weeks of hard but enjoyable work on the construction of this model.
Its specifications are: Wing span, 8 feet; wing cord, 14 inches; wing loading, 8 ounces per square foot.
Make an accurate full size drawing of the side view of the fuselage on drawing paper. Place this on a large flat piece of soft wood and hammer one inch brads along the outside edges at close intervals. The longerons are one-quarter inch square very hard balsa. Hold these over the mouth of a steaming tea kettle and bend to the approximate fuselage outlines. Cut the fuselage uprights, making a duplicate of each and place them between the longerons, using plenty of cement.
Pull out all of the brads after the sides have dried. Remove them from the drawing and split the sides apart with a thin double edged razor blade. Obtain a large sandpaper block and sand both sides of the fuselage until very smooth.
Pin one side of the body to the work bench, cut two of the longest cross pieces in the top view to the correct length and cement them in their proper place. Then lay the other side of the body on top of this making sure that all sides are square. After this has dried glue the tail posts including the tail skid together, wrapping well with silk thread. The rest of the top cross pieces are easily glued in place.
Trace the outlines of the nose on a piece of 3/32" plywood and cut to shape with a coping saw, gluing them between the longerons. The 1/8" plywood firewall is also formed. Before assembling the firewall be sure all of the holes are drilled and the coil and condenser are mounted securely on the back of it. Dope the firewall and fuselage nose with two coats of "black" followed up with two coats of "clear." This is to make it resistant to the destructive action of gas and oil.
Prepare the metal motor mount from half-inch angle duraluminum. Also make the landing gear fittings, tail skid and tail mount fittings out of duraluminum. After assembling these to the fuselage the structure will be ready for covering.
Wing
All of the ribs in the center section are the same shape and size but the rear of the tip ribs are cut off to fit flush with the trailing edge. The wing is assembled in three sections, and upon completing, the two tips are joined to the center section, adding the twelve inches of dihedral.
Double Paper Covering
The wing, fuselage, and tail assembly are all double paper covered. Covering in this manner produces a strong and durable coating for the plane which will not split into long tears when punctured.
Place the tissue on the parts to be covered with the grain of the tissue running lengthwise. Spray with water and follow with two coats of clear thin dope. Add another layer of tissue with the grain running crosswise to the first covering. Spray the second coat with water and apply two coats of heavy clear dope.
Tail Unit
Try to make the tail units as light as possible, so that the wing may be placed closer to the nose. This will increase the longitudinal and directional stability. Fill in around the metal mounting parts with 1 /8" sheet balsa to produce a more rigid assembly.
That's all there is l Hope you have a winner!
Scanned From August 1939
Model Airplane News
![]()
![]()
![]()
![]()
[ Home ] [ Previous Plan Pages ] [ Special
Things ] [ Earl Stahl Plans ]