|
|
|
|
|
|
The Plan Page
[ Home ] [ Previous Plan Pages ]
[ Special Things ] [ Earl Stahl Plans ]
gt-hunter1@home.com
Build and Fly This Miniature Monocoupe
Here Is a Super-detail Model That Is a Fine Flier
As Well As a Real Miniature of a Well Known Airplane
By ROGER J. HAMMER
|
|
|
|
|
|
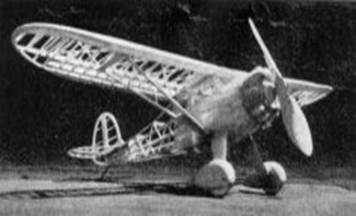
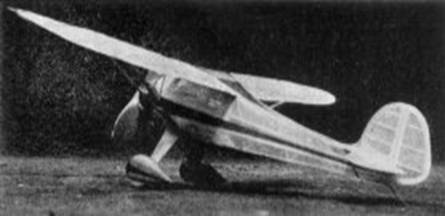
THE 1937 edition of the Monocoupe 90-A is the ship featured this month. The model is a faithful reproduction of the original and is true to scale in as many respects as possible. The Monocoupe is a clean cut sport plane employing highly streamlined struts, generous fillets and wheel pants. A novel striping job combined with a hand‑rubbed finish gives the Monocoupe a truly beautiful appearance. Employing a 90 h.p. Lambert R‑266, the top speed is 130 m.p.h. with a cruising speed of 112 m.p.h. The climb is 900 feet per minute and the average fuel consumption is 27 miles to the gallon. The Monocoupe has made an enviable record among sport planes in years past and is remembered as a record holder in many lightplane competitions held at various airports throughout the country.
If a detailed flying scale model is desired, the plans should be followed exactly as shown, but those wanting a model with greater "flyability" should make a few necessary changes. These changes would be; less wing ribs (half the amount shown would be sufficient), larger stabilizer and omission of details such as movable flaps, ailerons, etc. The color scheme does not detract much from the flying qualities, but it may be left out if a "super light" job is desired.
Now that you have made up your mind as to which type of model you want to build, familiarize yourself with all the details in the plans and start building.
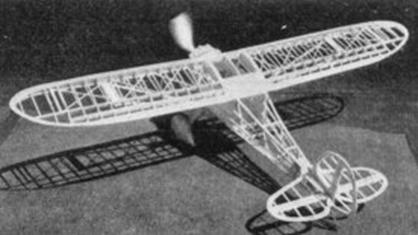
Fuselage
The fuselage sides are constructed first, the longerons being 1/8" square medium balsa. After sticking in pins along the longerons to make them coincide with the curves shown on the drawing, cement the uprights and diagonals in place. Proceed with some other work while the fuselage sides are drying. After the sides have thoroughly dried, cut the braces shown in the top view to the correct size. The two sides may be jigged up now and the cross braces cemented in. Let the fuselage dry, and during the time that elapses, the propeller may be carved. The side and bottom formers should be cemented on next and the planking of the front portion should be started. Although this part of the work is tedious, the result obtained is well worth the additional care. Sand the planking with rough sandpaper and when it has reached a thickness of approximately 1/32" it may be finished off with very fine sandpaper and doped. In doping, add two or three drops of castor oil to the dope so that it will be more flexible. This will keep the dope from shrinking excessively and warping the thin planking. Form the landing gear struts and insert them in the fuselage. The sheet balsa may be inserted now and cemented in place securely. Refer to the detail in the drawing when doing this. The construction of the pants is simple, so we will not go into detail. However, when cementing them in place take care to see that they line up correctly. If you make your own wheels, don't forget to insert small brass bushings into them for smoother turning and greater wear.
The cowling, crankcase and front plug may be formed by hand quite accurately, but the exacting modeller will turn them on a wood-turning lathe (that is, if he has access to one). Most modellers will have access to a small electric motor and they will be able to do work just as good as any done on a lathe. Cement a small block of wood onto the pulley of the motor, and when it has dried enough, start the motor. Take a small sanding block with rough sandpaper on it and hold against the whirling block. After a little practice you will be able to turn out accurate wheels and cowlings in a short time. Now that you have acquired the knack of making these parts, you may proceed and make yourself a cowling that any modeller would be proud to own. Since you have already made the propeller, bend the rear hook and shaft to shape and cement in place. Now that your fuselage is nearly complete, add all the detail you may want. The cowl bumps are shaped from small scraps of wood and are cemented onto the cowling at the proper intervals. A good mixture for making fillets for the landing gear can be made by mixing equal parts of fine sawdust and cement. After thoroughly mixing, apply the mixture with your finger and mould it to the correct shape. Make the fillet oversize to allow for the contracting cement. After sanding, wood filler may be used to fill the pores of the mixture.
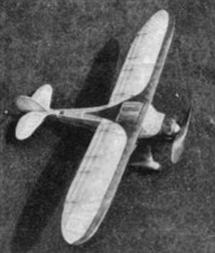
Wing and Tail Surfaces
In building the wing, have an absolutely flat surface to build your wings on, so that they will be free from warps. After cutting the wing spars to shape, slide the ribs into place and cement. Cut the leading and trailing edges to shape and cement in place. The wing tips should be added now and after moistening sheet balsa of the correct size, apply to the leading edge of the wing. This sheet covering may be held in place with pins until it is dry enough to cement. Sand the entire unit with fine sandpaper and any ribs that have been cemented in place a little out of position should be sanded down. Make the struts out of the correct size of sheet balsa, and while they are drying, proceed with the stabilizer and rudder. These parts are very simple and the only thing of great importance is to keep them from warping while under construction. After covering the entire model, spray with water, and set aside while the tissue tightens. The wing and tail surfaces should be pinned down to a flat surface while the tissue is drying so that they will not warp. Do not remove the wing from the flat surface too soon, because the underside of the wing may still be wet, and will warp.
After inserting two loops of 1/8" flat rubber into the model, give it a few test glides. If it dives, turn the movable stabilizer very slightly upwards. If it continues to dive, turn the stabilizer upwards a bit more. On the other hand, if it stalls, move the stabilizer down the correct amount. If the model performs satisfactorily with a few turns in the rubber motor, increase the amount until you are sure it will fly well under full power. If you desire to see a scale model that really climbs, put an extra loop of rubber in and lubricate it with rubber lubricant.
Scanned From April 1938
Model Airplane News
![]()
![]()
![]()
![]()
[ Home ] [ Previous Plan Pages ] [ Special
Things ] [ Earl Stahl Plans ]