|
|
|
The Plan Page
[ Home ] [ Previous Plan Pages ]
[ Special Things ] [ Earl Stahl Plans ]
gt-hunter1@home.com
|
|
|

A Model That Is "Different"-
Easy to Build With Excellent
Flying Qualities and Good Looks - With Pontoons It
Takes Off From Snow Or Water
By HERBERT K. WEISS
|
|
|
"MONOPLANES aren't practical for catapult work aboard cruisers," said the die-hards. " You've got to have biplanes that give you double the wing area for a given span; biplanes that don't have to be catapulted at a speed liable to break the pilot's neck; biplanes that can land in choppy water without tearing the pontoons loose; biplanes . . ."Biplanes that will he shot to ribbons by the first carrier-based monoplane that happens along!" interrupted a more liberal tactician.
"We need monoplanes," continued the tactician. "Sure we've got to put up with less wing area to fulfill the same space limitations; but maybe there's something we can do to make the smaller monoplane wing area worth just as much as the greater surface of the biplanes."
"Hooey!" exclaimed the die-hards. "Flaps will give you just so much. If you clip your span and overload your wing your lateral control at high angles will be shot to pieces. You can't build catapult monoplanes!"
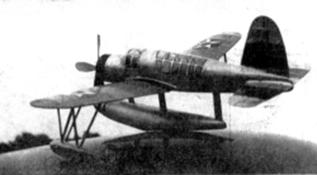
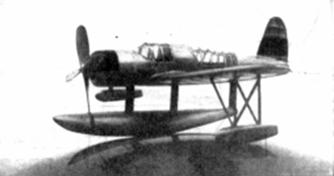
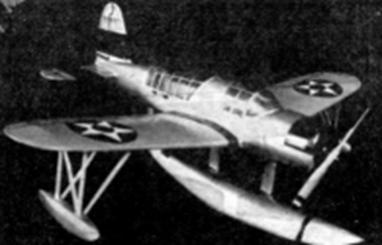
Well, the die-hards were wrong, as they, always are. The Vought-Sikorsky Company licked the problem, ingeniously and satisfactorily. The wing span of their new observation-scout XOS2U-1 is only 36 feet, only three feet greater than the length of 33 ft., 10 in. True, with the resulting small wing area, simple flails weren't enough. So the designers of the XOS2U-1 added "drooping ailerons," and let the ailerons. themselves jack up the lift coefficient of the wing a few decimals. And then, to improve lateral control, spoilers were added. 0rdinary spoilers -- rectangular plates raised inboard and forward of the ailerons to interrupt the airflow are not satisfactory because the airflow tends to break irregularly over them. But the Vought-Sikorsky spoilers, as patented by United Aircraft, have a saw-toothed edge, radically modifying the character of the disturbed airflow and making all the difference between successful and insufficient control.
The little scout has been tested with land gear and pontoons, and the navy is buying over two million dollars worth of the floated ships. They're low powered planes, 400 h.p. Wasps sit up in their cowls, but the smooth spot‑welded aluminum alloy construction, the low weight (4,764 lbs. seaplane, and 4,542 lbs. landplane), plus the very small wing area, indicate that the XOS2U-1 is the fastest plane in its class in the world.
And so to our model. We've presented plans for both the land and seaplane version, so you can take your choice. Because it's lighter, the wheeled model will perform better. On the other hand, there's something about the lines of a seaplane that gets you. So make up your mind. We chose the seaplane.
Wing
In either case, the first part to make is the wing, as its center section is used as a jig for the fuselage. Make the wing in one piece, as shown on the plan. Tips are 1/16" square bamboo. The bamboo can be easily bent by holding it in the lighted end of a cigarette. The strut braces are 1/16" square balsa. Give the wing an inch dihedral under each tip and cement all joints firmly
Fuselage
Cut two halves of each former from 1/16" sheet balsa and cement the halves together, with a thin splint of balsa or bamboo across the joint. For a smooth job, only mark the position of stringers and cut the notches as you assemble the fuselage, to insure that all will fit.
Cement formers D E and G to the wing center section in the position shown. Add the two 1/8" x 1/16" side stringers and to these cement the remaining bulkheads. Top stringer is also 1/8" x 1/16", but the bottom stringer is 1/16" x 1/4" to provide strut room. Attach the remaining 1/16" square stringers, build up the cowl and cement it in place.
The cowl and the hood between cockpits may be either "filled-in" with 1/16" soft sheet balsa, or covered with 1/32" sheet. On the test model, the whole fuselage and main pontoon was "filled-in" with 1/16" sheet, giving it a very fine appearance, without adding excessive weight.
Pontoons
Tip pontoons are carved from soft balsa according to the shape given by the outline and templates. They may be hollowed out for lightness. Top stringer of the main float is 1/4" x 1/16" balsa. Cement float bulkheads to this, then invert and pin the assembly flat to the workbench to hold the shape while the remaining stringers are cemented in place. Bottom stringer is 1/8" x 1/16" and the wide stringers are 1/16" square.
The whole float should be covered with 1/32" sheet balsa, or "filled-in" with 1/16" soft balsa. The main struts are cut from 1/8" sheet balsa and sanded to streamline section. Cut slots in the fuselage keel stringer and the top pontoon stringer to pass these main struts.
Tail Surfaces
Cut the tail surfaces to outline shape from hard 1/16" sheet balsa, then cut out the inner outline, and substitute 1/16" square ribs.
Assembly and Covering
Cover the whole model, except for the top of the wing, which is yellow, with silver tissue. Cement the floats and tail surfaces in place. There is only one cockpit former - a bamboo outline at bulkhead "D." All of the others are painted on the celluloid with silver dope, and then outlined in India ink. Spray the model lightly with water, and when this has dried give the model two coats of thin colored dope, silver on the silver tissue and yellow on the yellow. Balsa parts should have three or four coats, sanded smooth between coats.
Paint or cement four stars on the wing in the proper places. Outline control surfaces in India ink. Finish with the many minor details, such as step, radio mast, lights, identification numbers, water rudder and others which can be obtained from photographs of the real ship.
Propellers
The seaplane has a four-bladed prop of hard balsa with stub blades. It's made from two 2-bladed props, each carved from a block 5/8" x 1" x 4". This prop will fly the ship, but if you're willing to sacrifice a little scale resemblance, you can obtain much longer flights by lengthening the two front struts of the main float so that the nose of the ship cocks upward, allowing a much larger and more efficient prop to be used. Use about four strands of 1/8" rubber with 2 inches slack.
Prop block for the landplane is 6-1/2" x 1" x 5/8". The scale prop is built up from scrap balsa to agree with the plans.
Flying
Glide the model first. If it dives, warp the stab's trailing edge up a trifle. If it stalls, add weight to the nose. Correct for spiral diving by applying opposite rudder.
Try powered flights in tall grass. For water take-offs, make sure that the model is perfectly adjusted; first, by hand-launched flights. Then wind it to capacity with a winder. Set the model gently on the surface of the water, being careful not to douse the pontoons, as the added weight of water clinging to them may interfere with the take-off. Then thrust the model smoothly forward, so that it is riding on its step as it leaves your hand. It should then lift smoothly from the water and fly. If it is sluggish in rising make sure that the pontoons are not waterlogged, add more rubber, or as a last resort, substitute a propeller of low pitch.
Scanned From December 1939
Model Airplane News
![]()
![]()
![]()
[ Home ] [ Previous Plan Pages ] [ Special
Things ] [ Earl Stahl Plans ]