|
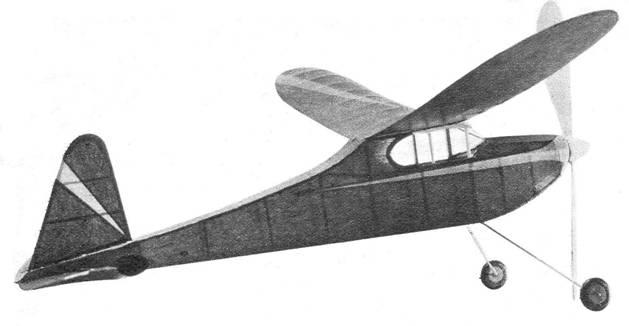
THE WISP A simple rubber driven cabin job that will give fine performance by DAN HEALD
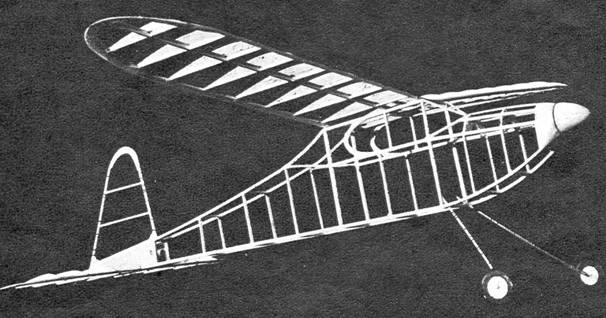
TOO many promising model builders are discouraged early because they can't make a rubber job fly. Usually they start on a so-called "flying scale" fighter plane, from which it is impossible to get any endurance anyway. Or they may get a small flying model kit which is sensationally advertised and yet, in most cases, won’t fly well either because of poor design, thin wings that invariably warp, small tail surfaces that leave the model unstable, or tiny props and short motors that cut the motor run practically to nothing. We know how discouraging this can be to a beginner for we have seen it happen all too often. To remedy this situation, the Wisp was designed primarily for flying ability, second for ease of construction, and third for eye-appeal. The outstanding flight characteristic of the Wisp is its steady, steep, turning climb. Unusually stable for so small a rubber job its flight is smooth and graceful. To attain this stability, the ample lifting stabilizer and rudder (set forward so it won't be blanketed by the stab while climbing) have a long tail moment arm. The lifting tail allows the c.g. to be farther back which in turn permits a longer motor. The short nose produces a nose-up couple, which together with the large prop and powerful motor accounts for the steep climb. With these features in mind, a simple box-type fuselage and constant-chord wing were employed to make construction as easy as possible. And to top it off we hope you'll agree that the result is a snappy, attractive little job! We aren't going to boast that it will climb two or three hundred feet and cruise half a mile because naturally so small a model couldn't possibly; but we do guarantee that if he follows the directions carefully, even a beginner can get many inspiring, consistent flights from the Wisp. Before actually starting construction read carefully the following directions, referring constantly to the plans and skeleton photo until every detail is clear. Every effort must be made to do a careful, accurate job. Your extra effort will be rewarded by a really slick looking model with all the more flying ability. Since the fuselage will take the most time to build, let's get that done first. It is important that you obtain some medium-soft 3/32" square balsa; do not substitute pine or harder or larger sizes, for a small model cannot carry the extra weight. Lay these longerons down, steaming the top one aft of the wing to take the curve. The bottom nose longeron from landing gear forward should be cut from scrap 3/32" sheet. For the uprights, cut the square stock down to about 3/32" x 1/16" (see skeleton photo) to reduce unnecessary weight; every little bit really adds up. Fill in the tail with 1/16" sheet, cutting out space for the stabilizer. Put in window former of 1/16" sheet. Be sure the joints are all securely glued. Take out the pins, lay down another piece of waxpaper over the first side and construct an identical second side. Let them dry thoroughly before removing. If the sides are at all out of line the body will be weaker and the incidence on the wing wrong, so it is essential that they follow the plan exactly even if they must be cracked and reglued. Next, put in the crosspieces starting with those at the cabin and working forward and back making sure they join at right angles to the fuselage sides. The sides must bend evenly; they will if the wood is of the same strength, otherwise "help it along" until they are even. You may think it is silly to worry about so many small mistakes but the strength, beauty and flying ability of your model depend on it! Glue the three top formers and 1/16" sq. stringers on the nose, sheet in around the front of the cabin and add the V front windshield brace. Then carve the nose-block from a soft block and drill for thrust button. The landing gear instead of being heavy wire is flexible 1/16" round bamboo running about 1/2" into the fuselage where it is well gusseted and cemented. The 1" balsa wheels are held on by a pin running along the inner side of the bamboo, then sticking into it and securely wound with thread. This extremely light landing gear setup has worked perfectly and helps substantially to keep the ship light. Finally, it's a good idea to sand the whole framework very lightly, eliminating bumps that would mar the papering. The tail assembly is easy, but glue the joints well to prevent warping. Leading and trailing edges of the rudder are 1/16" x 1/8" balsa, the tip 1/16" sheet, braces 1/16" sq. The stabilizer leading edge is 1/16" x 1/8", trailing edge 3/16" x 1/16", tips and ribs 1/16" sheet, and top spar 1/16" sq. Only one stab rib pattern is shown so merely cut it down to fit the tip. Carefully sand both rudder and stabilizer to smooth airfoil section; never leave the trailing edge squared off but sand it to a sharp edge. The wing is built around a 3/32" sq. leading edge, a 1/8" sq. spar, and a 1/4" x 3/32" trailing edge. From very soft 1/16" or 1/20" sheet cut 16 main ribs. Place them side by side upright on the table and sand them even so the paper job will be smooth. Firmly glue them and the tip ribs and 1/16" sheet tips in place and reglue all the joints for strength. Sand the wing tips and trailing edge to sharp edges. Leaving the section over the cabin flat, give the tips 1-1/2" dihedral and brace and glue the centersection firmly. The framework is now completed except for the all-important propeller. Many an otherwise beautifully constructed model has failed to fly simply because of a poor prop. So don't pass it over lightly, do a good job and you will be well rewarded. Don't be lazy and buy a cheap inefficient one at your dealers; instead try cutting one out from the block dimensions given—it's not hard and really gives you a good job. Using a medium weight block accurately cut it to dimensions given on the plan, then simply cut away the excess. Round off the corners until the outline has the usual smooth lines and pointed tips. Carefully sand this into a smooth slightly cambered airfoil section with thin tips and trailing edges. Balance carefully in the middle, sanding the heavier blade until they are even. Shape a spinner from a soft block and fit it onto the prop. Put a hardwood thrust button and several washers on a prop shaft, then secure it to the prop and spinner. Now give the whole several coats of dope, clear or colored, sanding lightly in between coats until your prop is smooth and strong, giving high thrust and low drag. Since the rubber motor tilts down and would give the prop upthrust, securely glue the thrust button into the nose-block at slight down-thrust and right-thrust; the latter will counteract torque and induce turning climb to the right. Your little dream ship is now ready to be covered. Pick any color scheme desired (the original was black with red trim), but make it flashy, for your Wisp is sure to be an eye-catcher. Using dope as an adhesive, put the covering on smoothly and evenly sticking down all loose ends. Through more than eleven years experience we have found that paper applied with the grain going span-wise on the wing results in a tight job, but one that sags excessively between ribs, ruining the airfoil and greatly lowering the lift. So we apply the paper with the grain running chordwise and, by allowing it to pull the wing evenly up to elliptical dihedral, we obtain a practically perfect job with a great deal less dip between ribs and a much more efficient wing. Try this method once; we believe it best although everyone else uses the opposite system. The elliptical dihedral should lift the tips to about 2". Whatever method you use, do a neat job and prevent excessive warping while the water spray and dope are drying by holding the surface flat on a table with books, etc. Two coats of dope are needed for strength and to fill in the pores of the tissue so the wings do not "leak." Lastly, glue in the tail pieces, put a dowel in front of the cabin and a hook in the middle at back of the cabin as hooks for the rubberbands that hold on the wing. Cellophane windows, shrunk by water, complete the job. Now comes the fun and thrills of flying that you have worked for so long. Depending on the weight of the model and the prop, either 3/16" or 1/4" flat brown contest rubber should be made into a 14" loop, carefully lubricated and installed (using a dowel or piece of hardwood as rear hook). When ready to fly, select a breathless day, for even a small breeze can buffet such a light model and cause a crackup. The original Wisp "flew right off the drawing board" with no adjustments necessary, but different models may react differently. First, adjust the weight until it balances at center of the wing chord or even slightly aft. (Most models should balance farther forward, but the design is such that this is not the case for the Wisp). Test the glide over a soft surface such as grass. If your model is built exactly, the wing will have 2° incidence and the stabilizer 1° and it will glide slowly and smoothly; however, you may have to add or subtract incidence until the glide is at its best. When this is done, never change the balance or incidence thereafter but vary the thrust line to improve the power flight. Slight right turn on the rudder may be needed to spiral the plane more and keep it from stalling. If down-thrust or side-thrust is still needed to perfect the climb, change and reglue the thrust button but don't ruin the glide by adding weight or changing incidence. When your Wisp is fully adjusted, which is really an art in itself, fully wind the motor by hand or with a winder and enjoy a beautiful full length flight. All your hours spent working and perfecting details will be rewarded by many hours of enjoyment flying the little ship. If you are a beginner who longs for a simple model that he can build and make fly, take off, climb and soar all by himself, the Wisp is your plane. Good luck and lots of good flights!
Scanned From January, 1946 MODEL AIRPLANE NEWS
|